Clapperboard Explained
Clapperboard Explained
he humble film slate, scuffed and scratched and tossed casually aside between setups, is actually a very important piece of equipment that no film set should ever be without.
In this post we’re going to give you the insider’s tour of the slate. We’ll show you how to use a film slate on set, including how to mark the slate properly. We’ll also advise you on how to slate correctly for the camera so you’ll know what you’re doing right from the first take.
In this post we’re going to give you the insider’s tour of the slate. We’ll show you how to use a film slate on set, including how to mark the slate properly. We’ll also advise you on how to slate correctly for the camera so you’ll know what you’re doing right from the first take.
INTRODUCTION
Get to know the slate
Clapboard, clapperboard, film clapper, movie slate. They all mean the same thing if you’re searching for images of the universal symbol for “film production.” But on an actual film production, it is only ever called the slate — at least in the United States.
There are two parts to the film slate. The “slate” part is where we write all the identifying information about what is being recorded. Traditionally, this was made of actual slate, just like chalkboards.
Old timey writing slate
The addition of hinged clapper sticks came about with sound, but these were originally clapped separately from the written slate.
Australian filmmaker F. W. Thring is credited for coming up with the idea of attaching the clapper to the top of the film slate. This was further perfected by pioneer sound master Leon M. Leon.
While you can still find wooden and chalkboard style slates being used, you’re more likely to see the acrylic “whiteboard” style on most sets. These are lighter and much more durable.
More importantly, they are a lot easier to see in just about any lighting environment because of the translucent nature of the plastic.
Acrylic slate
Now, what do we use the film slate for?
The clapperboard or clapboard — but always “slate” on set — is used by the Second Assistant Camera (2AC, also known as Clapper/Loader). The main purpose is to tell the post-production team when the camera has started (and stopped) recording.
That might seem like an obvious function, but there’s actually a bit more to it than that.
The “clap” of the clapperboard is what the editor uses to find where the video and audio of each take are synchronized. The editor looks for the spike in the audio waveform made by the clap of the sticks and lines that up with the video frame where the clapper sticks meet.
Waveform of slate clapping
Of course, for years editors have been using apps that can sync files automatically by matching up timecode or other metadata within the media files themselves. Technology isn’t perfect, however, and there are still plenty of times when the footage has to be synced manually.
This is part of why the AD calls for quiet before she calls the roll.
The clapper sticks also have another purpose. The stripes help set the film slate apart from the background. The 2AC can therefore use the stripes for measuring focal distances when a shot calls for pulling focus.
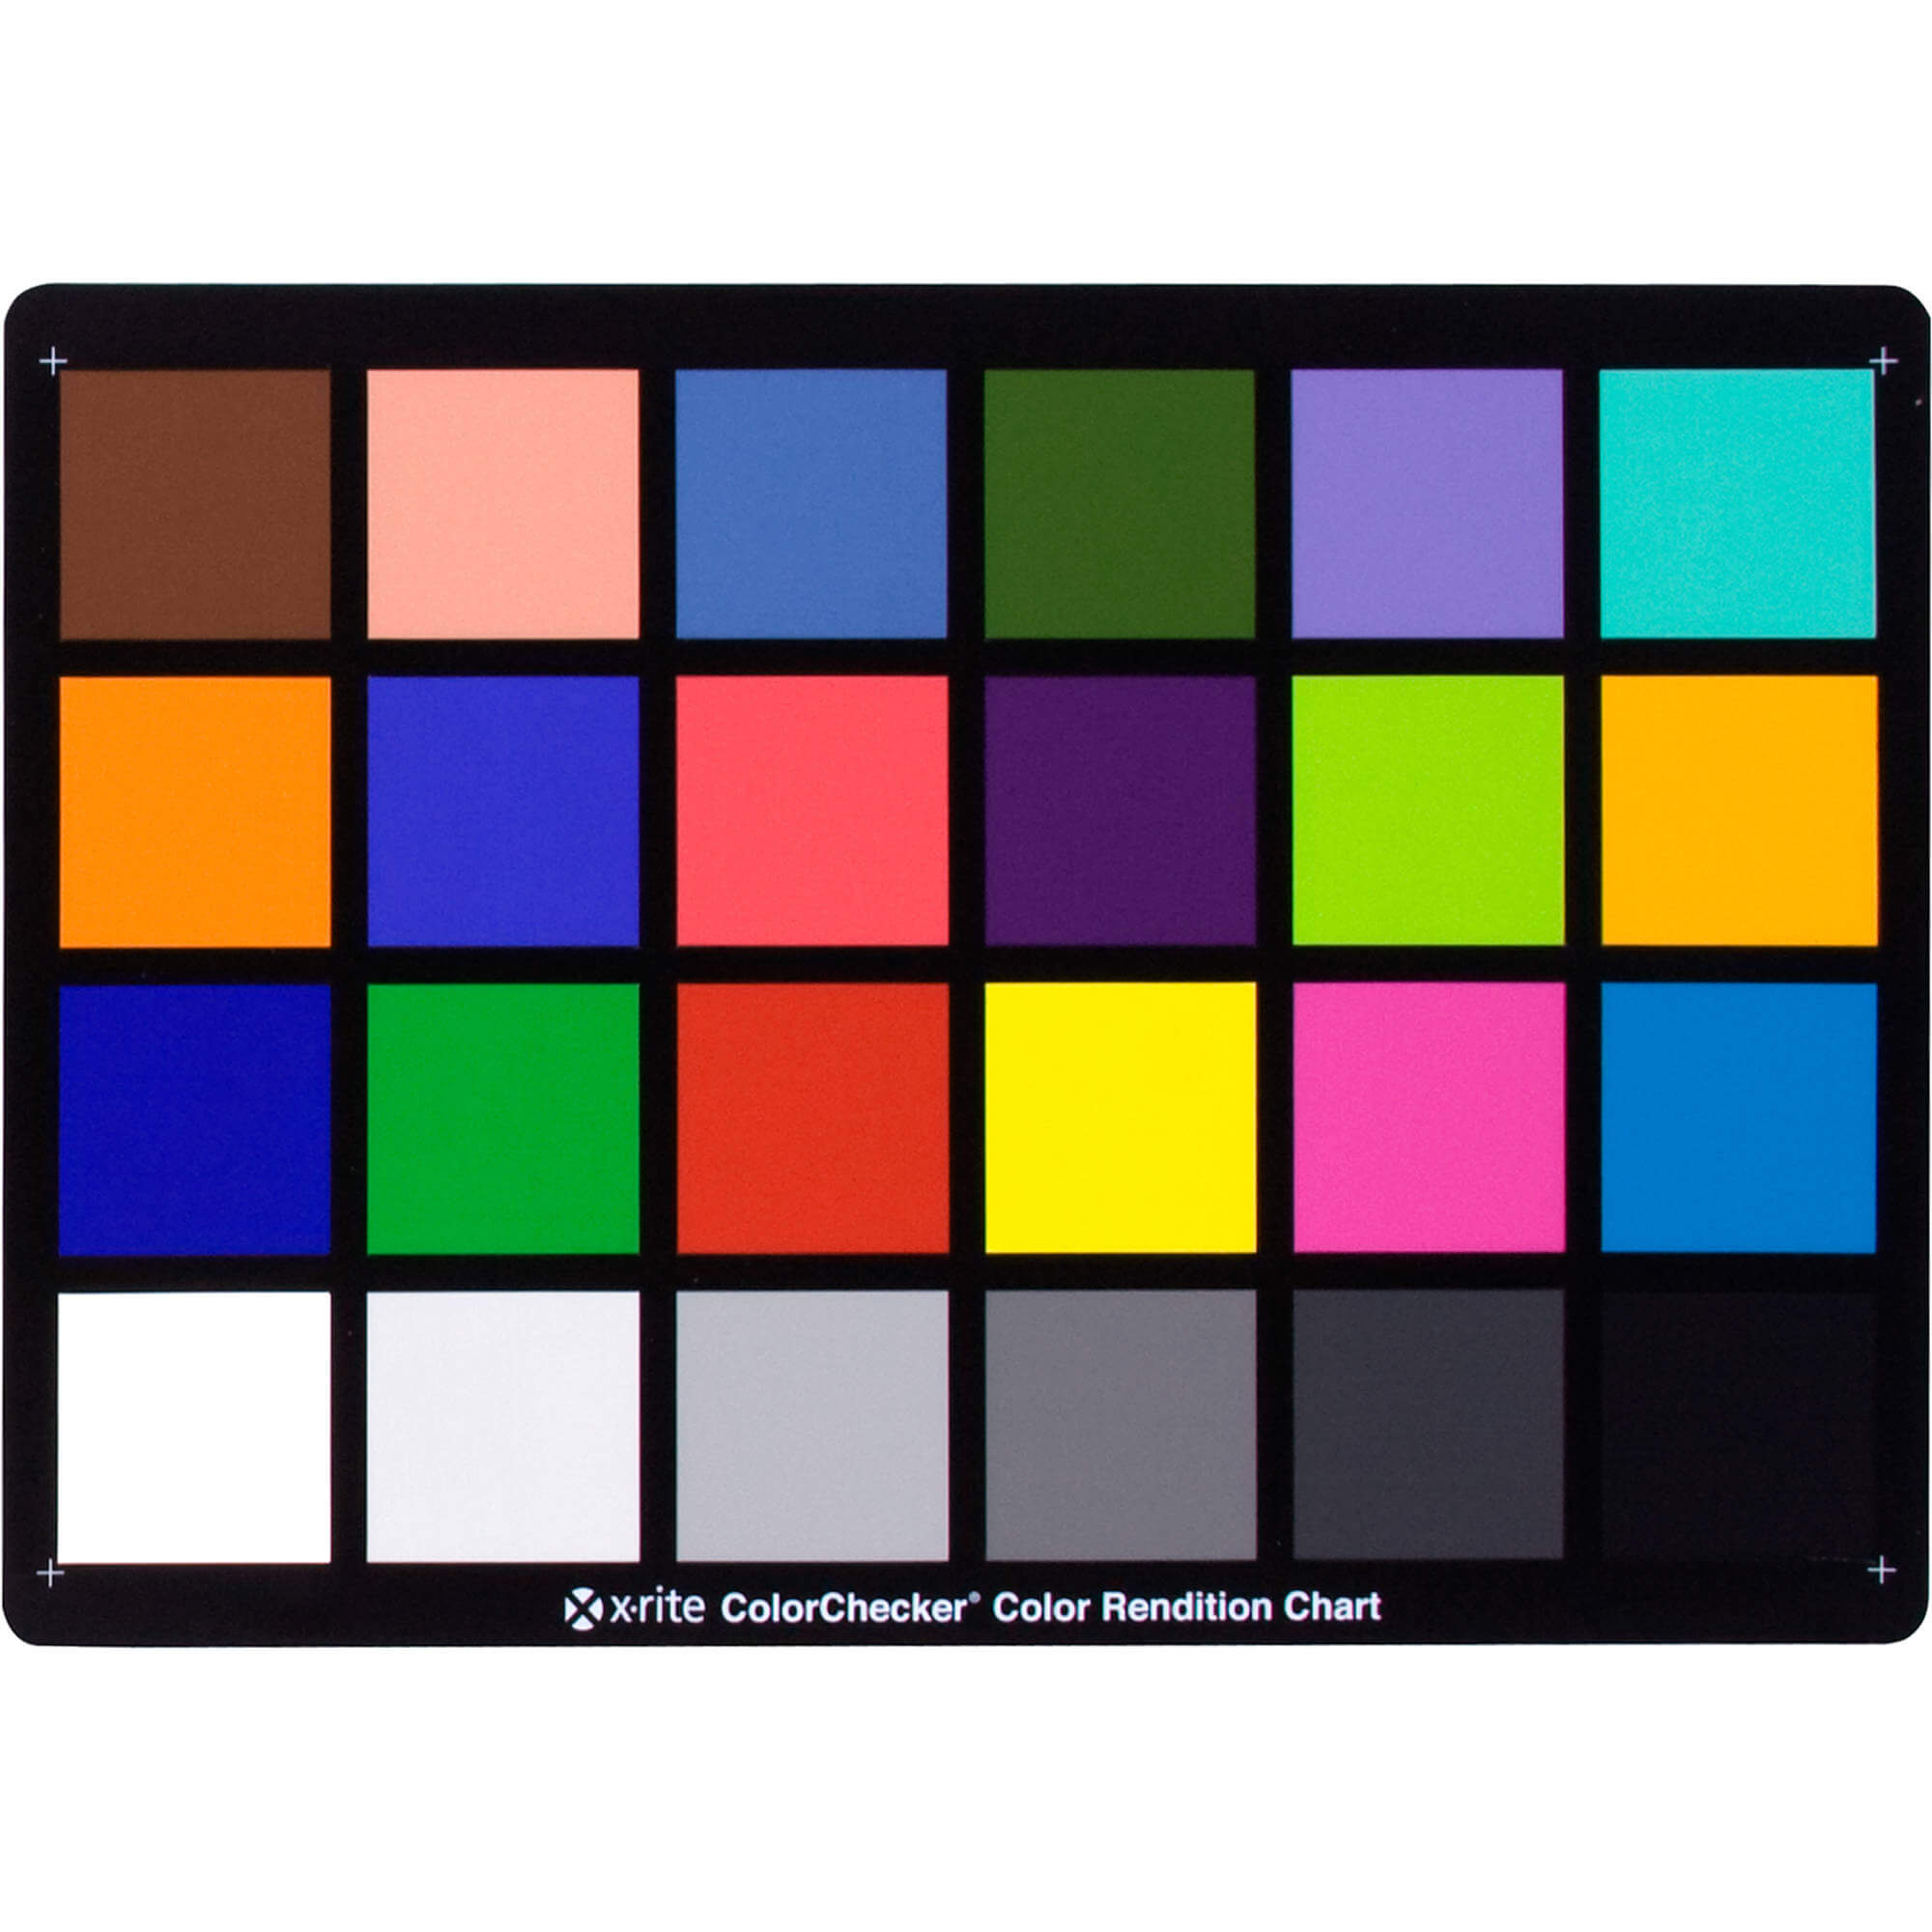
In a pinch, the stripes can also be used for white balancing or for color reference. Most of the time, however, the camera department will come prepared with calibrated color check cards like this:Color check card
Now that you know what the film slate looks like and what it’s for, let’s talk about what to write on it and when.
HOW TO USE A FILM SLATE
Mark the slate correctly
The first thing to know about marking the slate correctly is that each space on the film clapper (but always “slate” on set) corresponds to the Script Supervisor’s report.
SCRIPT SUPERVISOR (“SCRIPTY”)
What does a Scripty do?
The Scripty is the person who liaises directly with the editor. The assistant editor uses the Scripty report to find information about each file — especially which takes the director liked — or to find the files themselves.
Scripty job description and duties:
- Keeps a log of each take
- Keeps track of general continuity
- Makes notes on each take (e.g., whether good or bad)
When marking the slate, the Scripty is the boss, so always check with him if you’re unsure of what to write on a space. Because movie clapperboards come in a variety of layouts.
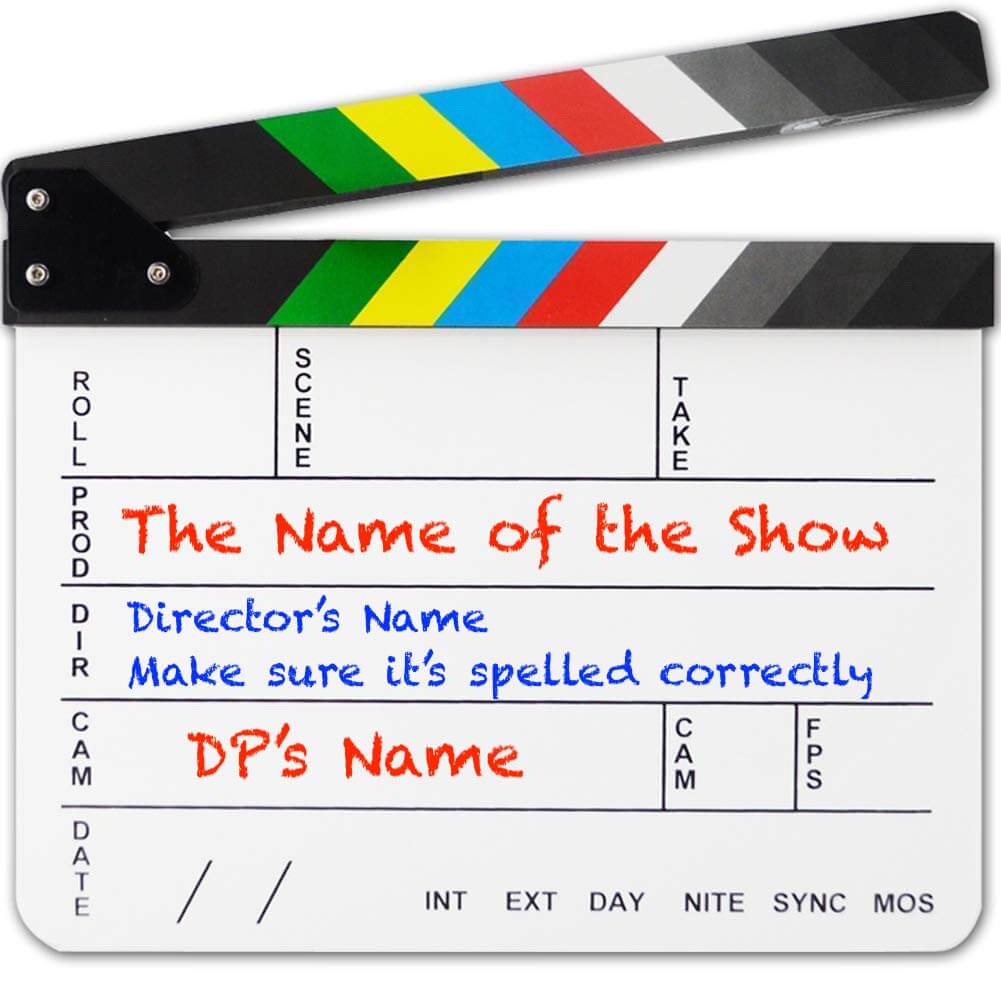
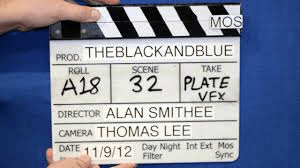
Some have a lot of areas to fill in, others have just the basics. Whatever your film clapper looks like, these are the areas that a working film slate must have a space to indicate:
- the Scene Number
- the Take Number
- the Roll (or Reel) Number
This information is collectively known as the “Head ID” because it comes at the of the clip the editor will see. Except when it doesn’t. More on that later.
Important spaces on a slate
ROLL NUMBER DEFINITION
What does roll number mean?
The roll number means which roll of film you’re shooting on. If you’re shooting on digital, it identifies the media file. We use three-digit numerals for the roll number alongside a letter to identify which camera the roll was recorded on. If you only have one camera, your first shot on the first day should be marked: A001
You never know when a second or third camera will be brought in to cover a particular scene, or to move the shooting schedule along. So, it’s a good idea to always mark the slate for “A” camera, for consistency’s sake. Your editors will thank you.
If you’re on a production where you’re not going to have dailies, it’s a good idea to mark the audio file as well. Audio takes up less media space, so there may be a dozen camera rolls for only one audio roll. It will make the assistant editor’s job a LOT easier if you mark the audio roll.
Use a letter further down in the alphabet — X is good — to identify the audio roll. That way it can never be confused as another camera roll. Label it the same way you do for camera.
So your first shot on the first day would look like this:
Camera and audio rolls on the slate
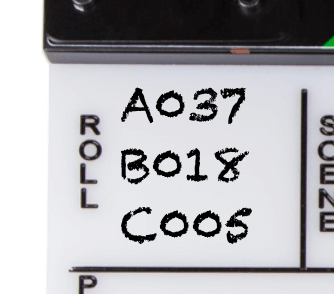
When you have multiple cameras, you would identify them as B, C, etc.
Multiple camera rolls
Pro tip: If you have three or more cameras for the full shoot, it’s best to have a separate slate for each one. Otherwise you’ll waste too much valuable production time just slating.
Scene Number
Marking the scene number is easy but it does take a tiny bit more practice. In the U.S., we mark the scene on the clapperboard using a combination of numerals and letters.
The numeral is the scene number in the script. The letter indicates the shot. Each time something about the shot changes — like the camera moves to a new position — you change the letter to whatever is next in the alphabet.
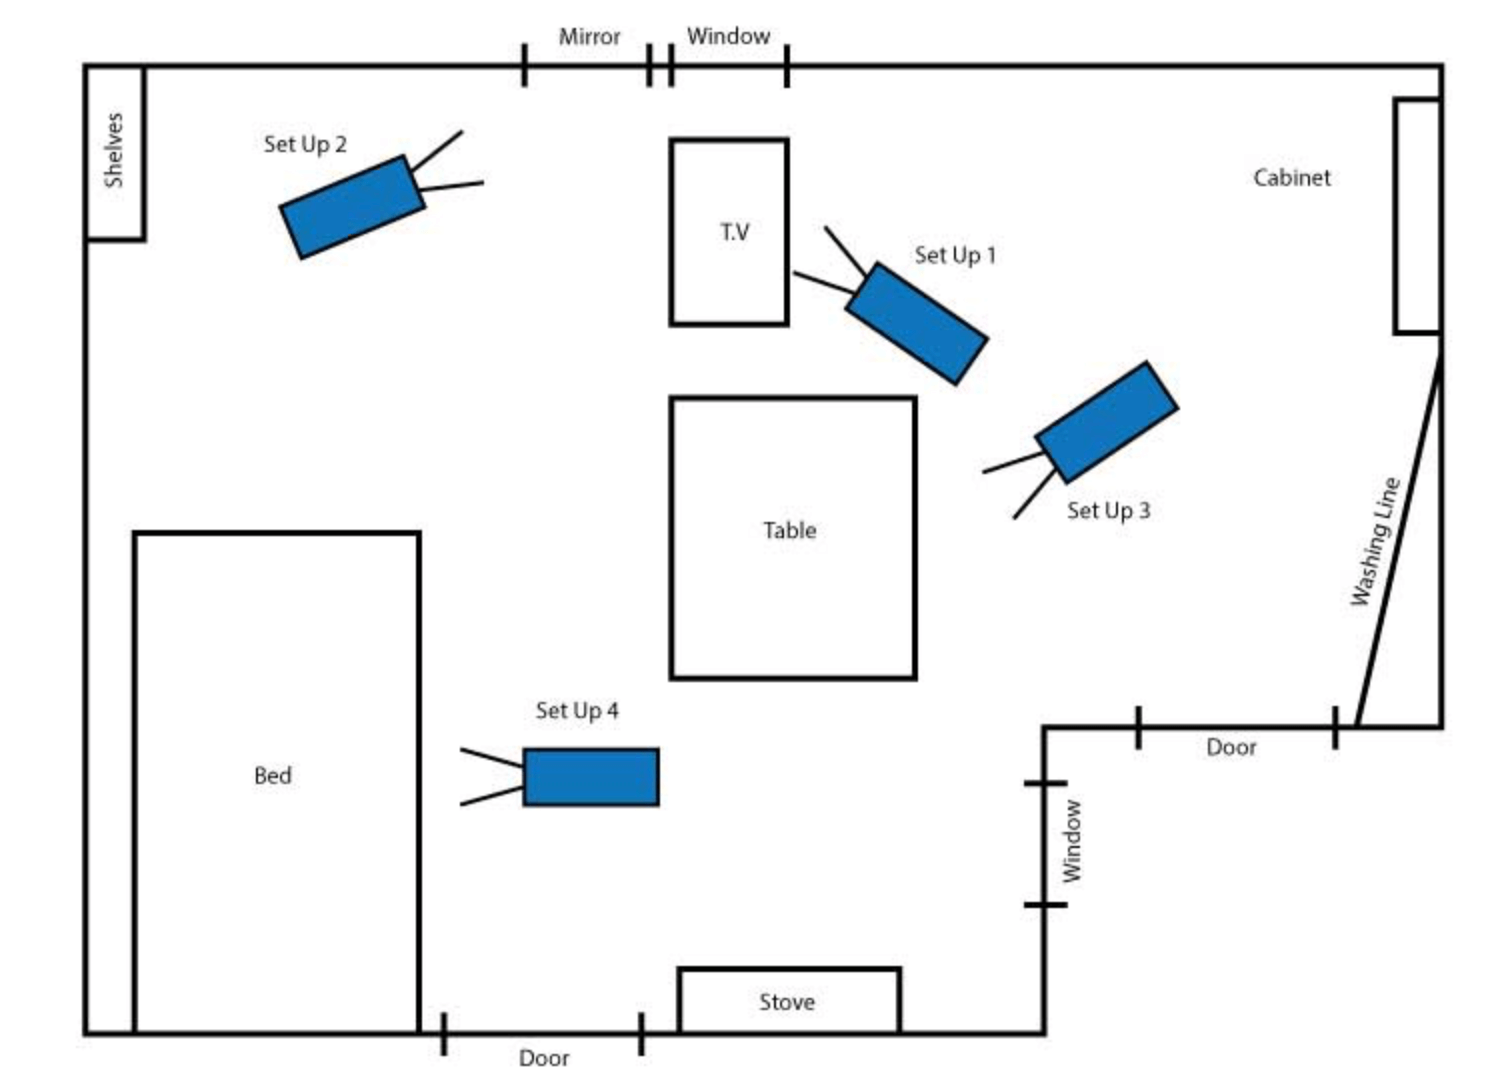
Let me show you what I mean using the diagram below:
Mud map of "scene 42"
For scene 42, our shot list shows four planned setups. For setup one we just write “42” on the slate under “scene.”
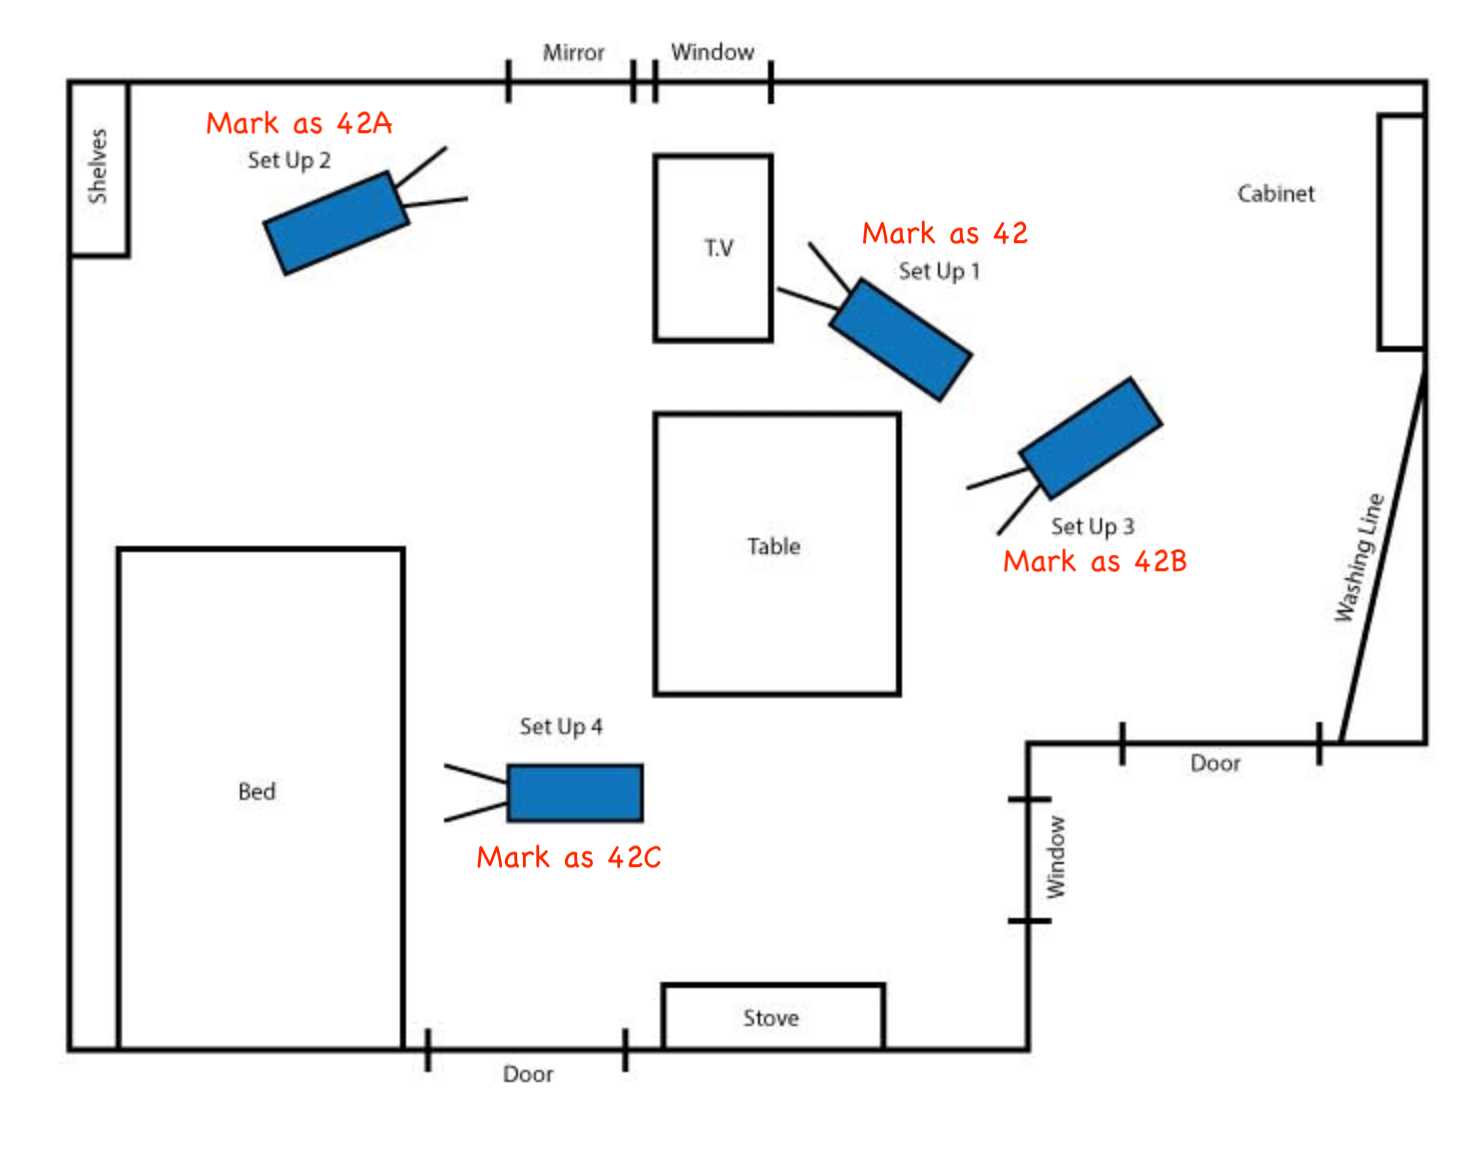
After a couple of takes, we move the camera to setup number two. Now we’re going to write “42A” under scene. For setup three we’ll use…
What do you think? You’re right! “42B.”
Here’s the diagram again with how each setup should be marked on the slate:
How to mark each setup on the slate
The one thing you need to remember when you’re marking the slate is that the camera doesn’t have to physically move for it to be a new shot.
Anytime you change lenses, add a filter, or go from a static shot to one with camera movement, that’s a new shot. You will need to mark the slate accordingly.
For example, going back up to our diagram, let’s say in setup four we changed the frame from a medium shot to a close-up. That means we changed lenses.
Even though the camera itself is in the same place, we would still mark the scene area of our slate as “42D.” Again, a new frame means new shot, which means a new letter on the slate.
Outside the U.S. and Canada, this part of the slate may be marked differently. But the idea behind it is the same: identify the scene number and each new shot.
Take Number
Take numbers are the easiest to mark. Takes are just identified by numerals in order from 1 to… well, however many are needed to make the director happy.
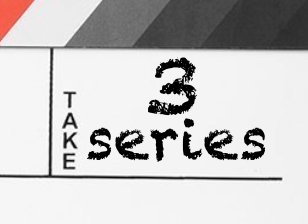
That said, sometimes the director will want to do a “series” instead of individual takes.
For example, if you’re shooting an actor’s reaction to something, it is usually more efficient (and easier on the actor) to just get a series of different reactions or versions rather than slating each one separately.
In this case, you would write the take number and “series” (or just “SER”) somewhere next to it.
Mark "series" when takes are super short
Another tag you might add to the “Take” label is “P/U” which stands for “pickup.” You would use this for things like when an actor flubs a line in a long speech and the director decides to do another take, but only starting from that line of dialogue.
“P/U” lets the editor know that only part of the scene was shot.
“Take” is the one area of the slate that will get the most wear on your film clapboard. Make sure you update it immediately after you slate for camera so the director can “go again right away” if she wants to.
IN PRACTICE
Mark the rest of the slate
The rest of the areas on your film slate are pretty self-explanatory. I don’t think you need to know what to do with the Date section, for example. But let’s take a look at the others and see what goes where.
Best to use tape on these spots
“Production” is just the title of the show. If you’re on something like a commercial or a corporate shoot, there may not actually be a formal title. You can either give it one for reference (e.g., Toyota Camry Advert), or just ask what should be written there.
You should only have to fill the in Production label one time, but to avoid smudging it away over the course of the shooting schedule, put tape on that part of the slate and write on that.
In fact, you can use tape on all of the spaces that only need filling in once to keep them from being smudged off. You want to keep the slate neat and legible at all times.
You’ll also want to make sure you spell people’s names correctly. I usually put people’s first initial and last name to save space, but sometimes people really want to see their whole name across the slate.
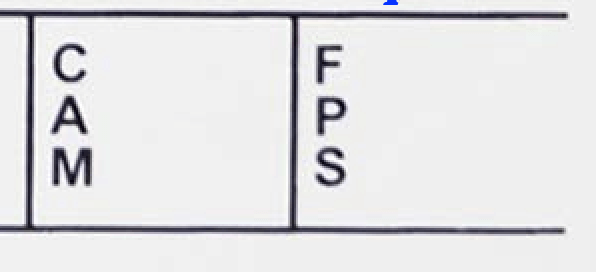
Camera and frame rate
Some slates have a separate spot for indicating which camera is recording, rather than including it in the roll number.
“FPS” (Frames Per Second) is where you can indicate the frame rate you’re shooting at. You would mark this section if you’re doing a slo-mo shot, for example.
Other slate details
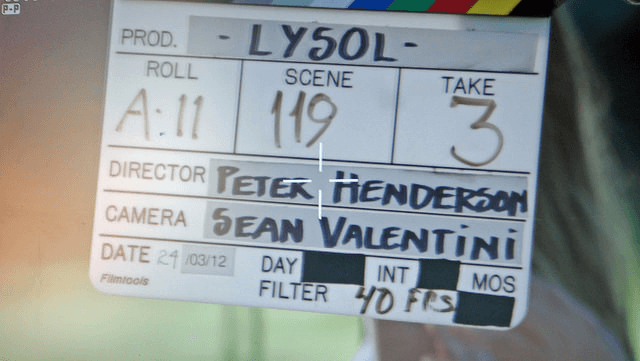
Finally, your slate might allow you to indicate if your shot is Interior or Exterior, or Day or Night. If so, just circle the appropriate information. Or you can use black gaffer tape to cover what isn’t true about the shot, the way this 2AC did:
Instead of circling, black out unused info
Doing it the way Evan Long did on Lysol keeps the information clearly legible and tidy.
Marking “Sync” on your slate just means that you are recording the video and audio separately, and that the clapper sticks should be used to synchronize the footage. That might sound redundant, but it’s actually important for the editor to know.
Finally “MOS” means that no audio is being recorded. Nobody knows why we call shooting without audio MOS, but it’s easy to remember if you know the old industry legend.
PRO TIPS
Slate like a pro
Now, once you’ve marked everything on the slate correctly and the AD is ready to call the roll, it’ll be your time to shine. Get into position and open your clapper sticks.
Stand where the Camera Op tells you your slate is both in the frame and in focus. If the camera has to refocus, it will just take up more time.
When both the camera and sound are “speeding” you call out the scene number and take number, then “Mark!” and clap the sticks together. Then get out of the frame immediately.
Easy peasy, right? Okay so there are just a few more things you need to know to slate perfectly.
The NATO Phonetic Alphabet
Remember, you’re also slating for audio so you need to make it really clear which shot you’re on when calling out the scene number. Letters like D and T sound a LOT alike when you only have audio to go by.
It’s better to use a word that starts with the letter of the shot you’re on. For A, apple or alpha; for B, Bravo or Benjamin, and so on.
For example, for our diagram practice scene above, you would call out:
“Scene 42 Bravo, Take 1. Mark!” then clap the sticks together.
Once you’ve been doing it a while, you’ll be able to have fun with slating.
Inglourious Slating
For your first few shoots, it’s probably best to stick to using polite words when slating for camera. Use the NATO phonetic alphabet:
Alpha, Bravo, Charlie, Denver, Echo, Foxtrot, Golf, Hotel, Juliet, Kilo, Lima, Mike, November, Papa, Quebec, Romeo, Tango, Uniform, Victory, Whiskey, X-ray, Yankee.
Hold on! Some letters are missing.
You’re right. I, S, O, and Z all look too much like numerals, so we don’t use them on the slate — at least, not in the U.S. Other countries may do it differently.
Soft Sticks, Second Sticks
There’s some nuance to clapping the sticks that you’ll need to develop as well. When you have to slate for a close-up, you’ll need to put the slate right in the actor’s face for it to be both in frame and in focus.
In these instances, you’ll want to use what we call “soft sticks.” That means you clap them very gently. You’ll also announce that you’re going to be using “soft sticks” (instead of “Mark!”) when you slate for camera and audio.
Using our trusty Scene 42 example above, let’s slate with soft sticks: “Scene 42 Charlie. Take 3. Soft sticks.” Then you clap the sticks gently.
If you clap them too gently, you might have to go for “second sticks.” This means that you didn’t clap the sticks loudly enough to be recorded for audio the first time.
When this happens, simply call out “second sticks” and re-clap a bit harder. Then, as always, get the heck outta the frame.
Speaking of volume, you don’t need to shout when you’re slating. The sound person’s whole job is to record dialogue at various volume levels. Just speak in a normal, conversational tone unless directed otherwise.
Slating and more tips for 2nd ACs
Tail Slate
Remember how earlier I said that the Head ID comes at the head of the clip — except when it doesn’t? Well, there will be times on set when you won’t be able to slate at the beginning of a take for whatever reason. When this happens you’ll do a “tail slate.”
The first thing is to be sure to call out “Tail slate!” as soon as “cut” is called so the Camera and Sound people don’t actually cut until you get your slate in there. To indicate a tail slate for camera, hold the clapperboard upside down.
Clap the sticks while the slate is still upside down, then flip it over so the ID information can be read by the editor. Or you can hold the slate upside down for a moment, then flip it over and proceed as you would if this were the beginning of the take.
Either way, you’ll want to get the tail slate done quickly. Everyone will already be resetting for another take or ready to move on to another setup. They don’t want to wait around for you.
Most experienced editors will know to expect a tail slate (or “end slate”) when there isn’t one at the head of the clip. But the Scripty will also mark it on his report that the take was slated at the end.
MOS
Slating for MOS is pretty simple, but there are several ways to do it. First, circle that place on the clapboard that says “MOS” if your slate has it.
Now, assistant editors only have a small thumbnail to select a clip from most of the time. So, they might not be able to see that bit of information, handy as it is.
We need to make it super clear that this take doesn’t have any audio. Otherwise the AE will go crazy looking for an audio file that doesn’t exist.
Add MOS label to closed sticks
One way to do that is to hold your hand over the clapper sticks. This means to anyone looking at even a tiny thumbnail that the sticks won’t be clapping, ergo, no audio.
Similarly, you can hold your hand in between the sticks. Again, this makes it clear that the sticks will not be coming together on this take. You can also close the sticks AND put a MOS label on the clapper sticks.
It doesn’t get much clearer than that.
Multiple Cameras
When you have to slate for multiple cameras, you want to be as efficient as possible. Slate in order, starting with A camera, which is considered the sort of “chief” camera.
Even if you can’t slate the other cameras in order for time’s sake or due to logistics, you should always start with A camera. You only need to call out the scene and take number once for audio, but you need to clap the sticks for each camera.
“Scene 42 Denver, take 7. A camera mark!” Clapper sticks. “B camera mark!” Clapper sticks. “C camera mark!” Clapper sticks..
Sometimes multiple cameras can see the slate without you having to move. In these instances you’ll call out “common mark” before clapping the sticks.
“Scene 42 Foxtrot, take 2. A and B common mark!” — clapper sticks.
CONCLUSION
Think of the workflow
Some final thoughts to bear in mind. First, never forget that the slate is a tool for communicating to other people. The information on it is to help the people working on the next stage of production do their jobs.
Write legibly, and keep the slate clear of extraneous information. Make sure the information about the take is accurate at all times.
If you’re confused or have a question about what needs to be written on the slate, check with the Scripty.
Speak clearly for audio, and clap the sticks at a volume appropriate for the shot. If you make a mistake, just call “second sticks.”
Always know where the slate is. Time is money and nobody wants to pay a crew to stand around while you look for your slate.
If you have to leave the set for any reason, leave the slate with the camera so someone else can jump in and slate if necessary. As 2AC, you’ll have responsibilities that will require your absence from the set, so get in the habit of that.





Comments
Post a Comment