Basics Of DSLR Camera
1st Course – Basics Of DSLR Camera
1st course: Camera Basics & functions
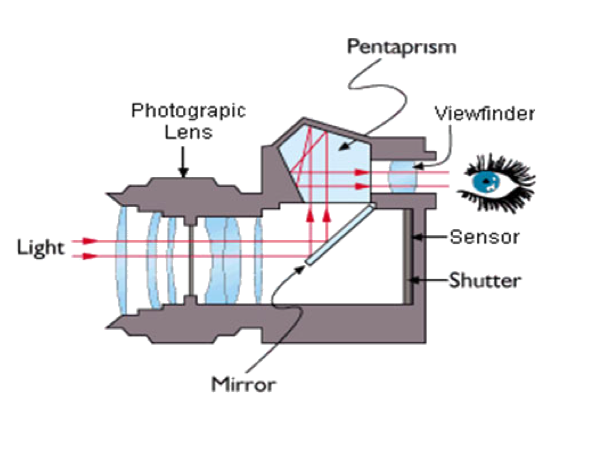
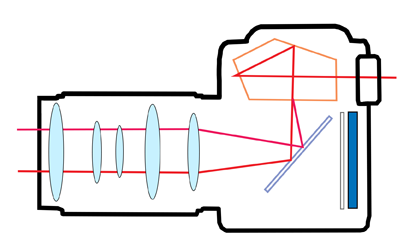
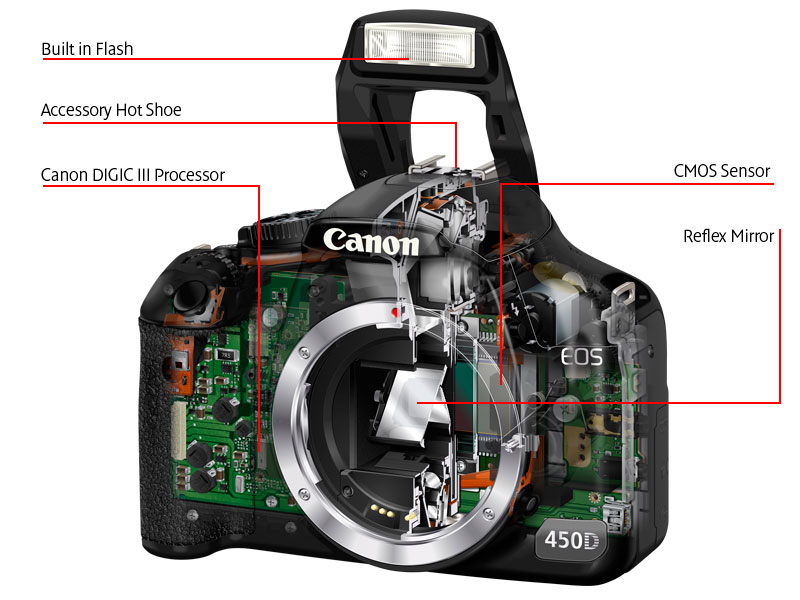
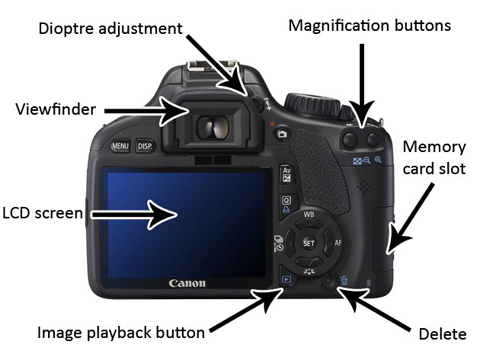
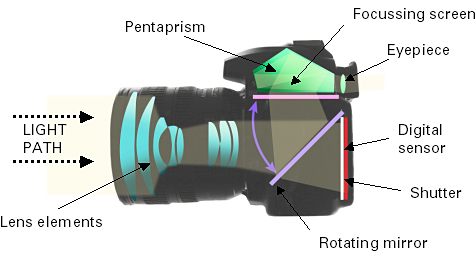
The figures below describe the main layout of a DSLR camera, it also illustrates the main parts of the camera.

When you buy a DSLR camera it comes always with a lens this lens is called “KIT LENS”.
Camera functions:
What is ISO:
ISO: the ISO number indicates how quickly a camera’s sensor absorbs light.
The higher the ISO number, the faster the camera sensor absorbs light.
ISO numbers follow a common scale on most of the DSLR cameras: 100 – 200 – 400 – 800 – 1600 -3200
Increasing the ISO settings in your camera always used when you are taking photos in the dim light.
Mirror lock-up: is a feature employed in many Single Lens Reflex (SLR) cameras. It allows the operator to reduce vibration-induced motion blur during exposure.

Mirror lock-up makes the mirror flip up for a moment before you activate the shutter. The idea is that the vibrations caused by the fast-flipping mirror can cause sharpness problems.
Shooting modes:

- Automatic mode: this mode is for beginners to take easy photos the camera selects all the settings, I don’t recommend to use that mode because you will feel like you are owning an ordinary digital camera
- Program mode: (P) Camera automatically sets the shutter speed & the aperture & you can adjust ISO & the white balance.
- Semi-automatic mode: Aperture mode A or AV (you chooses the aperture & the camera selects the other settings, Shutter mode S or TV (you choose the shutter speed & the camera selects the other settings.this mode more advanced if you learned what is aperture & shutter speed.
- Manual mode: You have the full control of your camera settings.
- Other modes: Landscape, Portrait, Night mode, Macro, Sports ( my recommendation if you learned how to use the manual mode & the Semi-Automatic mode you can ignore all of this mode & you will feel that these modes for the beginners only.
White Balance: (WB) is the process of removing unrealistic color casts so that objects which appear white in person are rendered white in your photo. Proper camera white balance has to take into account the “color temperature” of a light source, which refers to the relative warmth or coolness of white light.
In DSLR cameras we have:
-Auto white balance
-Sun
-Shade
-Tungsten
-Fluorescent
-Flash
-Custom
-K-Kelvin
Autofocus meter (AF):
one shot – For still subjects
AI Servo – For moving subjects
What is AF Point? it’s a point used for focusing it can be selected automatically by the camera or manually by you, when I look in your camera viewfinder you will see squares light up when you press the shutter half way down, these are your focus points & you can changes it manually through the AF button & move the light in any area you want to focus on.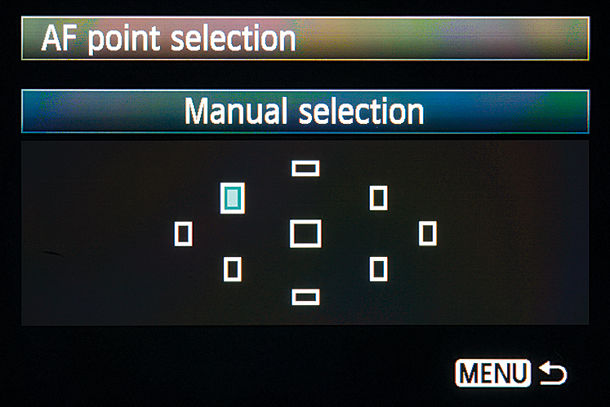

At this point I want to give you some advice that will help you to avoid poor focus images:
- Hold your camera well to avoid camera shake
- Don’t use very high ISO (except only if you are in a dim light & have flash & no other choice)
- Clean your lens
- Use tripods if you will take a long shutter speed shots
Menu settings:
The following are some menu setting:
-Color space: Adobe RGB (recommended for high-end users) or sRGB ( recommended for normal images)
-Quality/file size: (Large JPG recommended)
-Red Eye: (Turn on/off)
-Format: ( for erasing memory cards)
-Sensor clean: (Most of the cameras now have inbuilt cleaning)
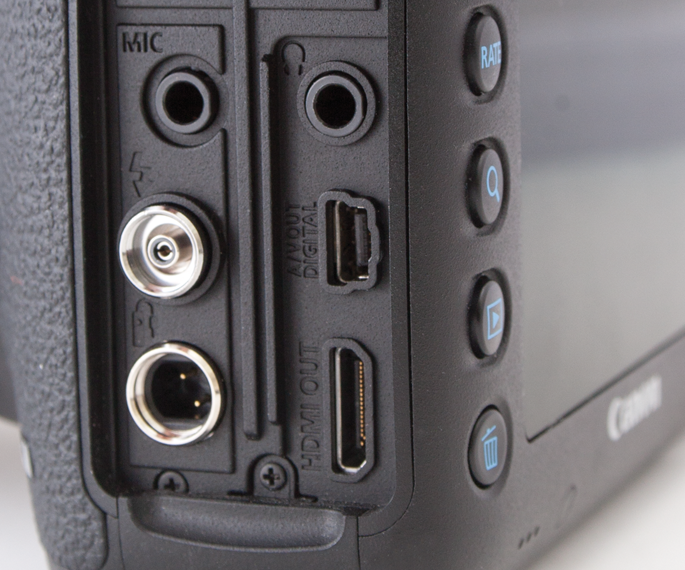
Inputs/Outputs for the camera:
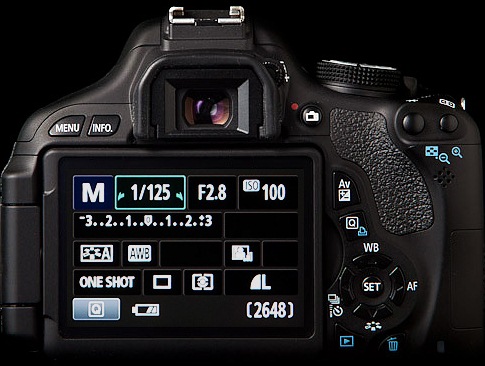
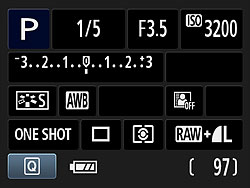
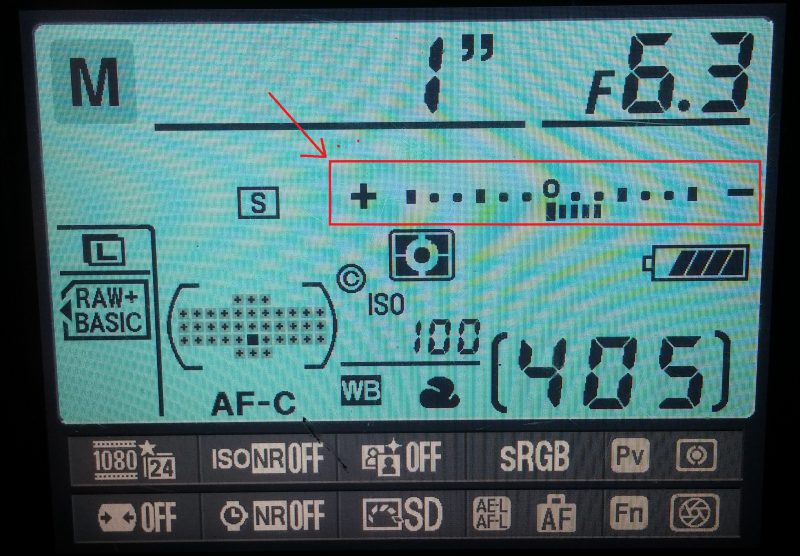
Finally, all the functions discussed in the first course you can see it on the display screen of your DSLR Camera:
2nd course: Lights,sensors & exposures
Lights:
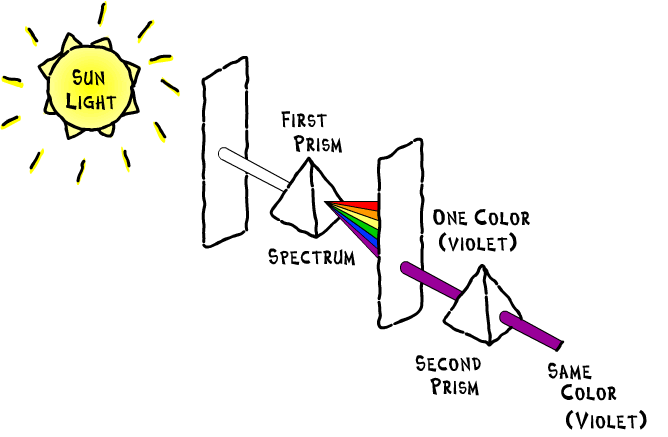
Understanding of light & colors begins with Isaac Newton (1642-1726), he is the first to understand the rainbow, as he refracts white light with a prism, resolving the light into its color components: Red, Orange, Yellow, Green, Blue and Violet.
RGB = Red,Green & Blue
sRGB = is a standard RGB color space created by HP & Microsoft in 1996 for use on monitors,printers, and the internet. (8 bit)
Visible light:
It is normal to think that light is perhaps white or transparent, in different conditions light can be a variety of colors, candlelight is yellow a cloudy day can be slightly blue & underneath a tree, in the shade, the light can be quite green.
A human eye can see a much wider range of colors than films or digital sensors, & the brain automatically adjusts for different colors of light.
The golden hour:
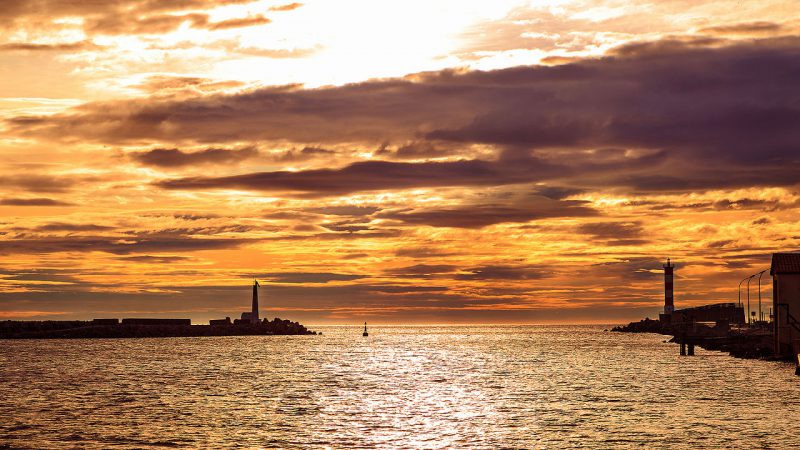
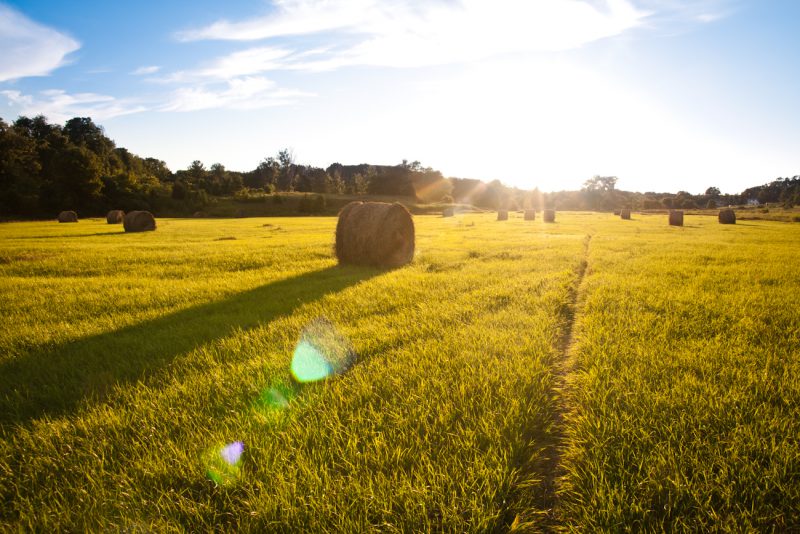
In photography, the golden hour is a period shortly after sunrise or before sunset during which daylight is redder and softer compared to when the Sun is higher in the sky.
Color Temperature:
Color & temperature don’t seem to have a direct relationship with each other, but light sources are often defined in terms of their color temperature & measured in Kelvin Degrees.

Walk through this video via ReelSEO:
Kelvin Scale:
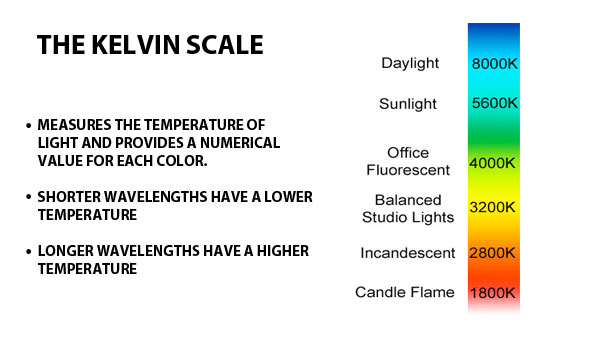
Like Fahrenheit & Centigrade, is a scale of measuring temperature, Zero degrees Kelvin corresponds to – 459.67 degrees Fahrenheit, the relationship between color & Kelvin temperature is derived from a heating “Black body radiator” ( think of it as a piece of black metal) until it glows, the particular color seen at a specific temperature is the color temperature, when the black body is hot enough & begins to emit light, it’s dull red. as more heat is applied it glows yellow & then white, & ultimately blue.
So we can define photography as “Recording Of Light”
That’s why taking a good picture depends on choosing the light carefully.
How is light is recorded by your camera?
The light recorded by the camera is reflected light bouncing off an object, the light starts at the source bounces off the subject & into the lens, the glass lens optics within the lens bends the light waves to focus on the sensor.
When the shutter button is pressed the shutter curtain opens & allows the sensor to record the light to create an image.
The duration the shutter curtains remains open is controlled by Time. & how much light is let in through the lens is controlled by Aperture. & the sensitivity of the sensor to record the light is controlled by ISO.
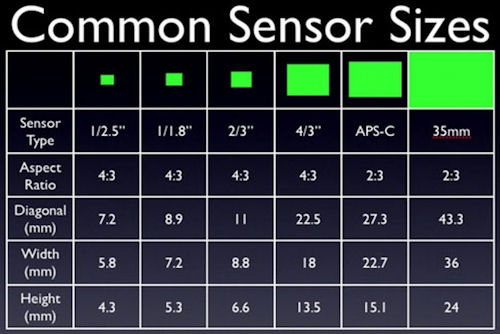
Sensors:
Is a device that converts an optical image into an electric signal, Today most digital still cameras use either a CCD image sensor or CMOS sensor, both types of sensors accomplish the same task of capturing light & converting it into electronic signals.
A CCD is an analog device when light strikes the chip it is held as a small electrical charge in each photo sensor, the charges are converted to voltage one pixel at a time as they are read from the chip, additional circuitry on the chip may be included to converts the voltage to digital information.
A CMOS chip is a type of active pixel sensor made by using the CMOS semiconductor process, extra circuitry next to each photo sensor converts the light energy into a voltage, additional circuitry on the chip may be included to convert the voltage to digital data.
Technology has a clear advantage in image quality.
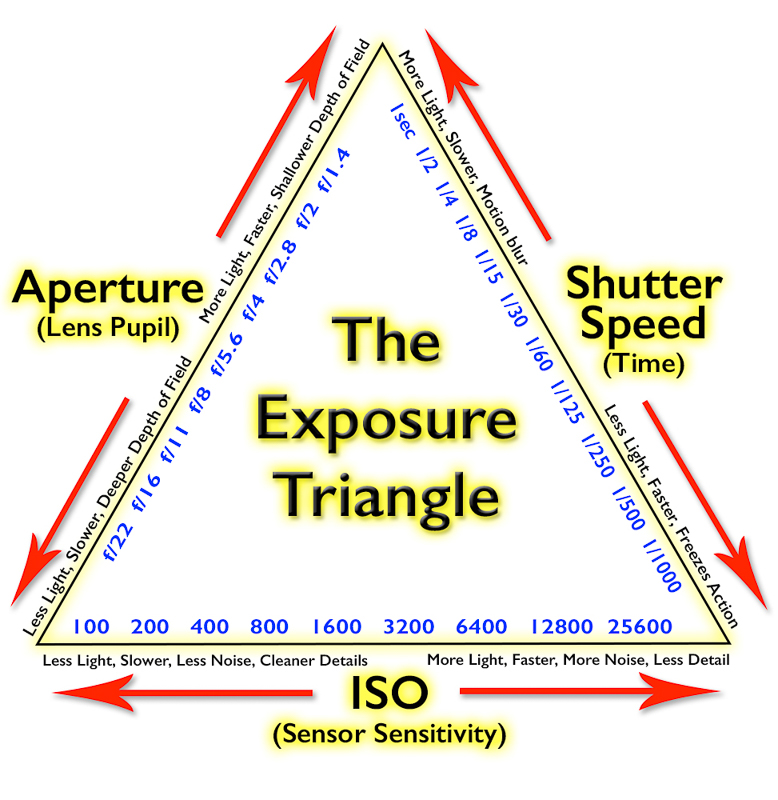
Exposures (EV):
The exposure formula = AV + TV + ISO = EV
these 3 elements work together to create exposure if you will shoot in manual mode so you will have a full control of these 3 elements: Aperture, Shutter & ISO.
ISO is probably the most important first step in the triangle, I hate shooting at high ISO because the higher the ISO the higher the noise you will receive in your image so I am trying to keep it low as possible, then I consider the shutter speed & the last thing to be considered is the aperture, but in the most cases it depends on what kind of images you want to capture, then you have to balance these 3 elements to create the perfect exposure.
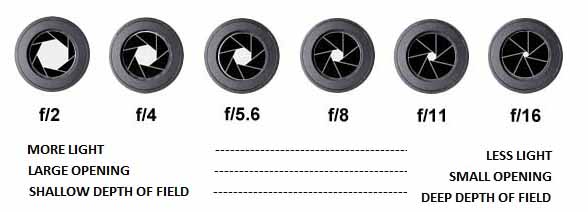
Aperture numbers (F-Stops):
Aperture is the size of the opening in the lens when a picture is taken.
When you press the shutter a hole opens that allows your camera sensor to catch the scene you want to capture, the aperture that you set impacts the size of that hole, the larger the hole the more lights gets in, the smaller the hole the less the light.
The below part will be little confusing to you but with practice, you will find it very easy.
“The higher the F number the smaller the aperture, the lower the F number the larger the aperture.”
The shutter speed:
The term shutter speed represents the time that the shutter remains open when taking an image, with a high shutter speed you can freeze a fast action shot or at a slow shutter speed you can blur the motion, if you take a shot of water at a slow shutter speed you will get the silky effect, you can take photo at evening & at night & can record star trails.
ISO:
A low ISO means a film responds slowly to light, a fast ISO speed means the film responds quickly, the ISO is a numerical indicator of the sensitivity to light, 100 – 1600 is a normal ISO range, although some cameras can go from 50 – 3200 & H, the higher the ISO number the greater sensitivity to light.
Dynamic Range:
Describes the ratio between the maximum & minimum measurable light intensities (White, Black, respectively).
Camera Dynamic Range & Human Eye:

Exposure:
Is the amount of light collected by the sensor during a single picture, if the shot is exposed too long the photograph will be washed out, if the shot is exposed too short the photograph will appear too dark, you will find in your DSLR camera screen light meter, some people let the camera automatically set for them the exposure but if you are the one controlling the exposure you can capture beautiful photos, exposure can be controlled by two things Shutter speed & Aperture.
How to eliminate blur & avoid camera shake:
There is a rule for sharp photo is to use a shutter speed which is at least as fast as 1 divided by the focal length of the lens, so for example if you are using zoom lens at 100 mm you should use shutter speed at least 1/100 of a second, if you are using 50 mm lens you will get a sharp picture at 1/50.
To eliminate blur:
- Use faster shutter speed
- Use a tripod
- You can use also self-timer
Some lenses have IS (image stabilization) options which help to reduce camera shake.
3rd course: Shutter type, shutter speed, freezing movement, zoom panning, bulb, fill flash & techniques to practice
Shutter Types:
Mechanical camera shutter:
It has moving parts & comes in two kinds – leaf & focal plane camera shutter types, leaf can be found in old cameras, film compacts & medium format camera lenses & the shutter is located inside the lens, focal plane shutter vertically running that gives more opportunity for higher speeds, this shutter is located in the lens focal plane inside the camera body & in-front of the film plane.
Focal plane shutter: is found in all digital DSLR cameras & consists of two curtains that work together, it travels in front of the digital image sensor, just above the plane of sharp focus hence, it’s name & works by opening one curtain to begin an exposure & closing another curtain to end it, the front curtain opens first, moving across the plane of the sensor until it’s fully open, then after the sensor has been left exposed for the desired amount of time the rear curtain begins to follow it, gradually covering the sensor until it is completely concealed.
Electronic shutter:
Simply turn the sensor on & off to capture the exposure, the image build up as light is captured by the sensor, because these camera shutter types don’t have moving parts they are less expensive & can be found in the cheapest cameras, but ironically also in the most expensive, they can be exceptionally accurate when designed with precision.
Shutter lag:
Is the time between pressing the shutter release & the camera responding by taking the picture, while this delay is insignificant on most film cameras & some digital cameras, it may be a problem when trying to capture subjects who are moving quickly such as in sports photography, today release shutter delay might be less of an issue again due to the release lag becoming faster & faster.
Shutter cycle:
It’s a process of the shutter opening, closing & resetting to where it is ready to open again.
Shutter speeds:
DSLR shutter speed range: 1/8000 up to 30 seconds, for beyond 30 seconds exposure you should use “BULB “B” function.
Note Any long exposure you have to use: Cable release (lock) or self-timer, tripod, mirror lock-up.
Fast shutter speed will stop action (sport) while low shutter speed will show (trail lights), a shutter speed of 1/500 is usually fast to freeze an action but a bird might need 1/2000 of a sec. shutter speed.
There is a common mistake when photographing sport and use fastest shutter speed to freeze action, this is fine in basketball or baseball, but with speedy sports such as motor sports, freezing the action with fast shutter speed will result in posed-looking shots.
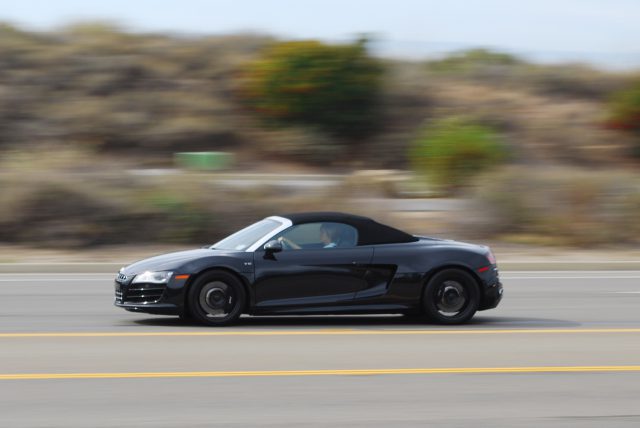
Instead, convey a dynamic sense of motion with a slower shutter speed while panning with the action (the subject stays sharp & the background is blurred).
So now you have two choices either fast shutter speed to freeze the motion or lower shutter speed to give a sense of movement of the object.
Freezing movement:
When photographing a tennis player hitting a serve, you would be trying to capture the athlete fully extended with the ball poised just on or before the racket, and use high ISO.
Special lenses with a wide aperture & usually a fixed focal lens are required for sports photography.
Panning:
Is the horizontal movement of a camera as it scans a moving subject when you pan you are moving your camera in synchronicity with your subject as it moves parallel to you, in order to pan successfully your camera has to follow the subject’s movement & match it’s speed & direction as perfectly as possible.
Tips for successful panning:
- Panning requires steady hands & a relatively slow shutter speed, The actual shutter speed depends on the speed of the subject but generally, it will be 1/200 or slower, 1/200 if your object is really flying along, like a speeding car on a race track, & maybe 1/40 if your subject is a runner on a track.
- Keep in mind the faster your the shutter speed is the easier it will be to keep your subject crisp, especially in the beginning don’t slow your shutter speed too much just keep it slow to begin to show some motion, till you get the enough confidence you can slow your shutter more to show even further motion & thus separation of your speeding subject from the background.
- Make sure your subject remains in the same portion of the frame during the entire exposure, this will ensure crisp, sharp subject.
- Remember the faster your subject is moving the more difficult it is to apply panning technique.
Panning techniques:
1-Zoom Panning:
With the zoom lens set at minimum or maximum extension, select a slow shutter speed, when the shutter is opened smoothly zoom either in or out for the duration, this technique can create a very interesting motion effect.
2-Swirl effect:
This is achieved by moving the camera in a semicircle from left to right, or from right to left while keeping an area in the finder as the point of axis or point of focus.
3-Panning:
Moving the camera up/down or left/right depending on the orientation, for example panning trees would use up/down movement & moving water or other horizontally oriented subjects would be panned left/right.
4-Multiple zoom:
This can be made using a tripod, after each exposure just racks the zoom inwards a bit, if there is a point of focus or primary subject, make sure that you re-focus on the subject after each zoom exposure.
Bulb (B):
It is a shutter speed setting on an adjustable camera that allows for long exposure times under the direct control of the photographer, with this setting, the shutter simply stays open as long as the shutter release button remains pressed.
Note: Some cameras will produce excessive noise & are not suitable for long exposure photography, ensure you have a high ISO & long exposure reduction function in your camera menu enabled to reduce the noise.
Direct Flash Photography
Direct flash:
When to use Direct flash, in professional photography direct flash is often used as the last measure, in other words for a professional to shoot with direct flash, the available light is atrocious, there are no walls to bounce light from, or it’s just pitch black, in those cases direct flash is a life saver.
Most cameras designed for amateurs have a built in flash which blasters light directly at the subject, creating the same kind of “deer in the headlights”, the addition of an inexpensive flash unit for bouncing flash can reduce this harshness & give your picture a professional look.
Fill Flash Photography Tips
Fill Flash:
When taking photos outdoors, using the fill flash setting can dramatically improve the quality of your photo, use it in bright sunlight to lighten dark shadows under the eyes & nose of your subject, this is especially important when the sun is directly overhead or behind your subject, you can also use it on cloudy days to brighten up faces so they stand out from the background, in indoors if you are taking picture beside a window the only source of light is the sun coming through the window from outside, if no flash used the object will be dark & the background only will be fine but by using Fill flash we will able to properly expose the subject & the background.
4th course: Aperture, depth of field & lenses
Aperture settings explained
Aperture:
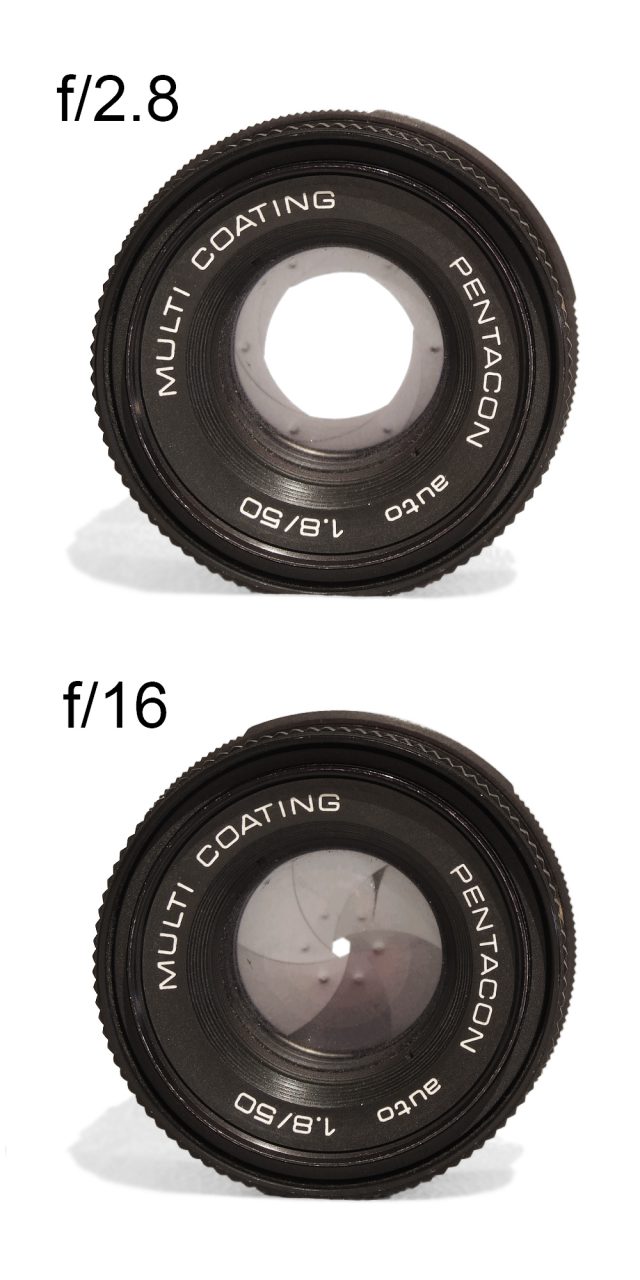
The aperture of the lens is the diameter of the lens opening & is usually controlled iris, the larger the diameter of the aperture, the more light reaches the film/ image sensor, the smaller the F-stop number the larger the lens opening (Aperture).
Aperture, ISO & time will complete the exposure triangle (all three values working together to get the right exposure).
 A larger aperture = small F number = allows more light
A smaller aperture = large F number = allows less light
A larger aperture = small F number = allows more light
A smaller aperture = large F number = allows less light
Remember: as the higher the F number the lesser chance of shallow DOF effect
Landscape & outdoor = High F number
Shallow DOF = Low F number (Portraits, Sports, Etc.)
Aperture value = F value
Digital camera depth field
The depth of field:
Is the distance within which the subject is considered acceptably sharp, the depth of field varies depending on camera type, aperture opening, and the focusing distance.
The depth of field is dictated by three factors: Aperture, lens focal lens & shooting distance.
Does aperture affect depth field?
1- Aperture setting:
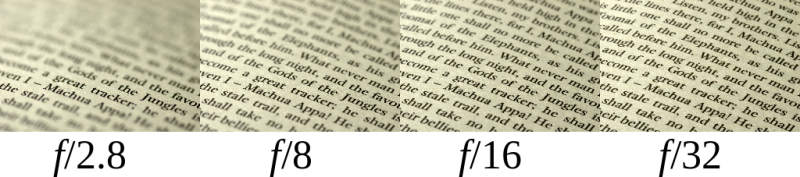
the smaller the aperture the deeper the depth of field (the other 2 factors remaining the same) for example, if the lens focal length & the shooting distance the same, the depth of field is much deeper at F/16 than at F/1.4.
2- Focal length of your lens:
the shorter the lens focal length, the deeper the depth of field (the other 2 factors remaining the same), for example, comparing a 28 mm lens with a 50 mm lens at the same aperture & shooting distance, depth of field is deeper with the 28 mm.
3- The distance the subject to the lens/distance from the subject to the background:
The greater the shooting distance the deeper the depth of field (the other 2 factors remaining the same), for example, if the subject is photographed from three & then from seven meters away, the zone of sharpness in the foreground & the background is greater at seven meters. F/5
F/5
 F/32
F/32
Digital camera lenses explained
Lenses:
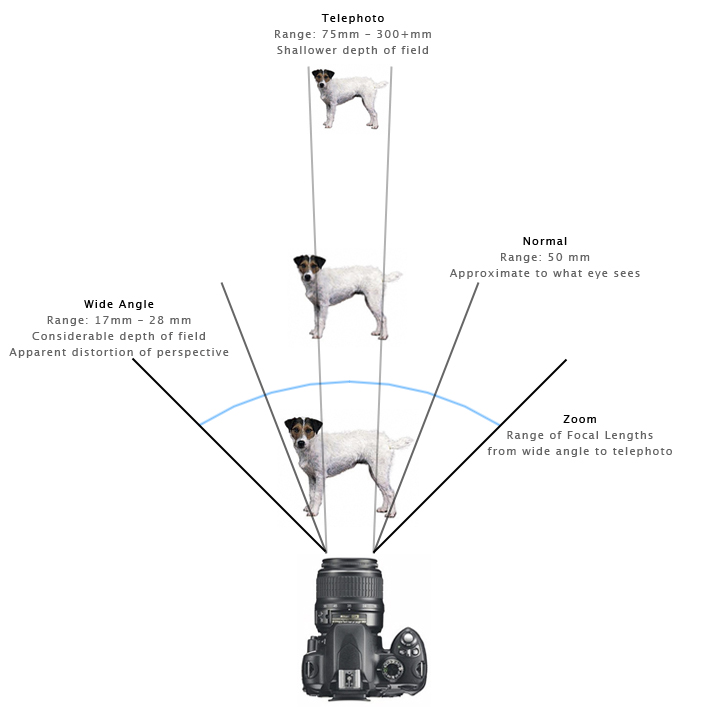
There are 3 basic camera lens types, Standard, wide angle & telephoto, the power of the camera lens is measured in millimeters & is known as the focal length of a lens, the 50 mm lens is deemed to be the standard lens for a 35 mm camera, (Prime lens) any camera lens with shorter focal length than this is considered to be a wide angle lens & any lens with longer focal length is considered a telephoto lens.
Wide angle lenses can be used in Landscape photography, the most common wide angle lenses are 18 mm, 24 mm & 28 mm.
Telephoto lenses are opposite to wide angle lenses, can be used in sports events, all the photographers lined up at the end of the pitch are using telephoto lenses, they can get excellent action close-ups & also reduce the depth of field.
Other lens types like macro lenses are used for close-up photography, they have similar properties to a normal lens, but they are able to focus a lot closer to the subject, common focal length are 50/55 mm or 90/100/105 mm, these lenses with the longer focal length come in very handy for taking close ups of subject that might otherwise be scared away, the optical quality of a macro lens is normally very high.
Fish-eye lens actually it looks like a fish eye, their angle of view is a full 180%, there is a trade-off in that pictures produced are distorted in that the center of the picture almost comes out to meet you where as the top, bottom & the sides of the picture appear to be further away.
Focal length:
Is a length of a lens is defined as the distance in mm from the optical center of the lens to the focal point
Typical focal lengths:
< 35 mm = Wide angle
50 mm = Normal lens
80 mm = Telephoto lens
300 mm = Super Telephoto lens
Focal length examples
The angle of view:
The following diagram illustrates the AOV for different types of lenses.
5th course: Circle of confusion,sharpness,resolution,contrast,composition rules & setting up your camera
circle of confusion in photography
Circle of confusion:
To understand the circle of confusion you must remember that light reflected off the subject in all directions, your camera will gather all the light rays from each point on the subject which are reflected toward the camera & fall within the circle created by the opening of the diaphragm.

You may visualize this as a cone of light which has its apex at the point of reflection on the subject & it’s circular base in the diaphragm opening, circle of confusion also referred as (blur circle, disk of confusion & circle of indistinctness), refers to the effect of non-converging, unfocused light rays that have entered the lens, when light waves don’t converge after passing through a lens, they produce a larger optical spot, instead coming together at a single point.
Being able to calculate the circle of confusion is important because it allows a photographer to interpret the depth of field necessary to render a focused image in the photograph.
If the photographer is at the proper distance from his subject, he can minimize possible light & chromatic aberrations, this better ensures that the different wavelengths of light entering the camera lens will form a concentrated, focused image on the film.
In simple terms, the circle of confusion is an estimated calculation of the depth of field necessary to produce a clean image.
Circle of confusion = COC
Out of focus = Large circle of confusion
In Focus = very small or no circle of confusion
Sharpness:
Is the most important photographic image quality factor because it determines the amount of detail an imaging system can reproduce.
Sharpness describes the clarity of detail in a photo & can be valuable creative tool for emphasizing texture, proper photographic & post processing technique can go a long way towards improving sharpness, although sharpness is limited by your camera equipment, image magnification & viewing distance, two fundamental factors contribute to the perceived sharpness of an image: resolution.
what does resolution mean?
Resolution:
The traditional analog world was easy to understand, negatives & print were continuous tones and one simply made an enlargement from the negative & transparency to the size needed. Today in the digital environment, many newcomers get tripped by the concepts of input & output resolution, & terribly confused as to what settings to use, to understand these issues clearly one needs to start with an acceptance of certain physical limitations of the human eye, our vision is incapable of discriminating detail below a certain level, this varies from individual to individual & even the same individual in different ways.
When an image is composed of dots smaller than this they appear to the eye as continuous tone, this has been relied upon by the printing trade for a couple of hundred years, every photograph & every image that you see in every book, magazine,calendar & art reproduction is comprised of dots of ink, at resolution typically ranging from 70 to 300+ dots per inch.
Best quality lenses, lowest ISO & the quality of your sensor will determine the recorded resolution.
what does contrast mean?
Contrast:
Is the range of difference between difference tones in a photograph, in black & white photography, contrast describes the difference between the darkest & the lightest tones, but also defines the grayscale, in color photography, contrast applies to how sharply colors stands out from one another.

Composition & design rules:
Rule of thirds explanation
Rule of thirds:
Imagine that your image is divided into nine equal segments by two vertical & two horizontal lines, try to position the most important elements in your scene along these lines.
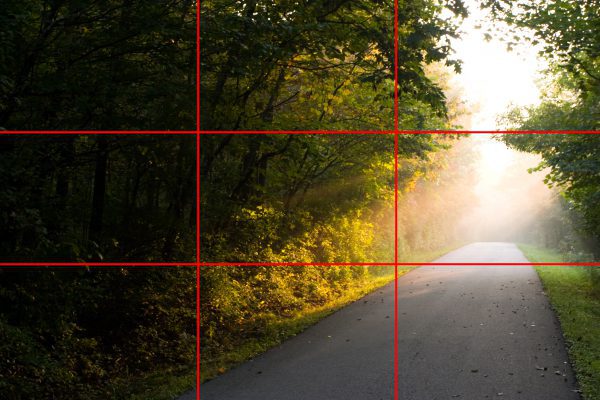
Placing your main subject off-center as with the rule of thirds, creates a more interesting photo, but it can leave a void in the scene which can make it feel empty, you should balance the weight of your subject by including another object of lesser importance to fill the space.


Comments
Post a Comment