12 Tips for Better Film Editing
12 Tips for Better Film Editing
I’m currently cutting a digital feature and this has made me think about editing styles. Here are an even dozen tips that I feel will make any budding film editor better at this craft. I’m sure not everyone will agree with all of these points, since they come out of my own approach and style. Nevertheless, I hope they offer some takeaway value for you.
1. Cut tight – The best editing approach is to cut tight scenes without becoming too “cutty”. This means taking out unnecessary pauses between actors’ delivery of dialogue lines. Sometimes it mean tightening the gaps within dialogue sentences through the use of carefully placed cutaways. It may also mean losing redundant lines of dialogue, after the director has reviewed your cut.
In general, my approach is to start with a cut that is precise from the beginning as opposed to cutting the first pass sloppy and then whittling down from there. Most basic films don’t support audience attentions for lengths over 90 minutes. If your first cut comes in at about 100 minutes, then you can typically get to 90 through further tightening of the cut. On the other hand, if it clocks in at two hours or longer, then major surgery is going to be needed.
2. Temp music – Many editors like working with temporary music as a placeholder. I advise against this for two reasons. First – people tend to fall in love with the temp score and then it’s hard to get real music that feels as good. Second – temp music becomes a crutch. You tend to be more forgiving of a weak scene when there’s interesting music than when the scene is naked. I prefer to cut a strong scene and make it work through editorial solutions. If a scene can stand on its own, then the addition of sound effects and a score will make it that much better. The exception is a visual montage set to music. Here, I tend to do better when I’m cutting to music rather than the other way around.
3. No Dragnet edits – The original Dragnet television series used a certain approach to cutting dialogue scenes. Audio and video edits tended to be made as straight cuts between the actors without any overlaps as they delivered their lines. It followed this formula: cut to actor A – deliver the line; cut to actor B – deliver the line; cut back to actor A and so on. Walter Murch refers to this as the Dragnet-style of editing. Our brains seem to react better to edits where the change in picture and sound is not always together. These are called split edits, L-cuts or J-cuts.
I suppose this more closely mimics real life, where we first hear someone start to talk and then turn our head to see them. Or one person is talking and we look over to our friend to see their reaction before they respond. Editing in a style where images often precede or follow the dialogue edit feel more natural to our minds and make the scene flow more smoothly.
4. Matching action – Matching actors’ hand positions, use of props, eyeline and stage position from one cut to another fall into the technical category of how to make a proper edit. Walter Murch offers a rule of six criteria that form reasons to make a cut at a given instance. The greatest weight is given to whether that cut drives the emotion of the scene or moves the story along. Technical matching is the least important concern. I’m not saying you should throw it out the window, because a mismatch that is too extreme can be very jarring to the audience. On the other hand, as an editor friend often tells me, “Matching is for sissies.” The audience will often ignore many minor continuity differences from one shot to the next if they stay totally engrossed in the story. Your job as the editor is to cut in such as way that they do.
5. Moving camera shots – Moving the camera around is a staple of action sequences. This might be a camera on a dolly, crane, Steadicam or just handheld. In an action scene, this is designed to create a level of tension. When I cut these shots together, I prefer to cut on movement, so that the camera is in constant motion from one shot to the next. Many directors and DP will disagree, preferring instead to start and stop each camera move before making the cut. Both approaches work under the right situations, but my tendency is to cut tighter and not let the audience’s eye rest on the set or a shot or a scene for too long, unless there is a reason to do so.
6. Don’t cut back to the exact same angle – If you have a choice of several camera angles, don’t automatically cut back to the same camera angle or take that you just used in the previous shot. This is, of course, unavoidable in a dialogue scene with only two angles and one take of each; but, if the director shot different takes with different framing, try to use a little of all of them. Don’t get stuck in a cutting rut, like master/single/reverse, master/single/reverse, etc. Mix it up.
7. B-roll shots in threes – When the scene calls for cutaway inserts, it feels right to use three on a row. Not a single shot, not two, but three. These should be at least 1.5-2 seconds long (or longer). An example might be when a character enters the room and looks around. The POV inserts work nicely in triplets and give the audience a good idea of the landscape that the character encounters. It mimics our real-world experience of moving our head around and seeing different aspects of the same surroundings.
8. Cut for the eyes – Actors that do well on TV and in films (as compared with the stage) are all very expressive with their face, but most importantly, their eyes. When I’m cutting an intense dialogue scene, I’m looking at how the actors’ eyes play in the scene. Do they convey the proper emotion? What is the reaction of the other actors in the scene? What the actors are or aren’t doing facially determines my cutting. It drives my decision to stick with the principal actor delivering the dialogue or whether I briefly cut away to see reactions from the others.
9. Pull the air out of actors’ performances – Going back to Item 1 – I like to cut tight. Recognize that many actors will overact. They will milk a scene for more than is appropriate. They will accentuate pauses, add more stumbles and stammers (where scripted) and give lengthy glances. Sometimes this works, but your job as the editor is to dial these back as you cut. Take these pauses out by cutting away and then back. Cut out redundant actions and line deliveries. Make it real, so it doesn’t feel like ACTING.
10. Shaping story – It is said that there are three films: the one that’s scripted, the one that’s been filmed and the one that’s edited. When you cut a feature, pay close attention to the story chronology and don’t be afraid to veer from what was written or filmed if it makes sense to do so. Many editors use note cards on a storyboard wall to create a quick visual representation of the storyline. This helps you make sure that you reveal things to the audience in the most logical order and that nothing is inadvertently edited out of place.
11. Digital aids – Modern NLEs and finishing techniques like digital intermediates offer a lot of tools that aid the filmmaker. For example, digital images are very tolerant of blow-ups. You can add camera zooms or blow-up a shot (creating a wide and a close-up from a single shot) with these tools. This is especially true if you shot on 35mm film or with the RED One camera, because the large image area of the film negative or camera sensor allows more overshoot space than HD cameras. Don’t be afraid to zoom in as long as the image quality holds up.
Many editors talk about using split screens for invisible edits. This is often done when the timing of the performance of two actors (such as in an over-the-shoulder shot or a two-shot) doesn’t quite match on the preferred take. Sometimes the original performance was right, but the pace of the scene has been picked up during the edit and now the timing of the two actors feels slow or late. If the camera is locked off and the overlap of their physical positions in the shot isn’t too complex, it’s a simple matter to create a new OTS shot. This would be a visual effects composite of these two actors with a slight offset in the timing of their performances.
12. Make your choices, but be prepared for others – Your job as the editor is to shape the story and the pacing of the film. First and foremost this means you are there to help the director realize his or her creative vision. But you were also hired for your own best instincts. Most editors finish a first cut without the director sitting over their shoulder. During that time is your initial chance at putting your own stamp on the film. When the first cut is completed, the director and editor work together to refine that cut into the director’s cut.
The choices you make in cutting tightly or altering an actor’s performance all factor into the look and feel of the film. For instance, you can heighten the tension between characters in a scene by cutting their dialogue in a way that one actor overlaps – or steps on – the other actor’s lines. This conveys a level of impatience that might not have been there in the way it was actually filmed. When you make such a choice, it alters the emotion of the scene and should be done only if that serves the story. Of course, you’ll only want to make this sort of edit if you have a logical reason for it, the director agrees with it and you have an alternate solution if the director disagrees.
I like to review the takes and make my own decisions about the best performances. On set, the director might have marked the third and fourth takes (out of four) as “circle takes”. I might actually like the front end of number one as the best way to start the scene, but then end on take four for the back half. I will frequently cut scenes that use a little of each take as I cut back and forth between actors’ dialogue lines. This will create the best composite performance of all the actors in a scene. When you do this, though, you should be prepared to defend what you liked about the choices you’ve made – and be prepared to change the scene back to something else.
Most directors aren’t going to review each and every take in the edit suite. They will react to your cut based on whether or not it works for them and whether or not they like the performances on screen. They will suggest changes and review one or two other takes to see if they really liked a different performance by the actor. The closer a scene is to one that feels polished and conveys the most believable job of acting, the more accepting a director will be of your cut.
What Are the Rules of Video Editing?
There are many rules of video editing, but we’ve narrowed it down to the top 10 that every video editor should follow.
1) Don’t Jump
Jumping occurs when consecutive shots of one subject change point of view. Beware if you are editing an interview, make sure to put in some b-roll in between shots of the interviewee when you cut out some of their dialogue. Otherwise, the video becomes very jarring for the audience.
2) Cut on Motion
This means that when changing from one shot to another, you as the editor should always try to cut from motion in the first shot. This makes the scene much smoother. Imagine the difference between cutting from a still train to an opening train door as opposed to a moving train cutting to an opening train door. The latter was much smoother.
3) Cut on Similar Elements
Cutting on motion and cutting on similar elements are great techniques for changing shots or scenes. Cutting on similar elements refers to cutting from similar looking objects or scenes between consecutive shots. For example, cutting from flowers in a garden to flowers in someone’s hair, cutting from one blue sky to the next, or cutting from a fan to helicopter blades. The focus of the shots doesn’t have to be the same, simply they must look alike.
4) Wipe
Wipes occur when the frame fills up with one element such as a person walking in front of the camera. Believe it or not, this can be a helpful transition between shots because it is not a clashing change for the audience.
5) Match the Scene
A wonderful part of editing is that footage can be taken from separate times and put together to make a congruent scene. In order to make this congruent scene, you as the editor must match the scene’s setting, motion, and elements. To match the setting, you could take footage from the park from a month ago and pair it with footage taken the day before. To match motion, for example, if the subject was running from the left of the frame to the right, then the subject should reenter the frame on the left. To match the elements, imagine the footage from a month ago was a man walking in the part with a briefcase and a suit. The footage from the day before must have the man dressed in the same clothes with the same briefcase in his hands.
6) B-Roll
Say you can’t match the scene or your footage is getting jumpy. That’s when inputting b-roll is very helpful. Always try to place b-roll in between shots that jump or don’t match the scene in order to minimize a jarring effect on the audience. B-roll is also helpful when breaking up a long and nondynamic scene.
7) 45*
If your scene utilizes multiple camera angles, you should always try to use shots that change the view on the subject by at least 45 degrees. This helps avoid a jumping effect.
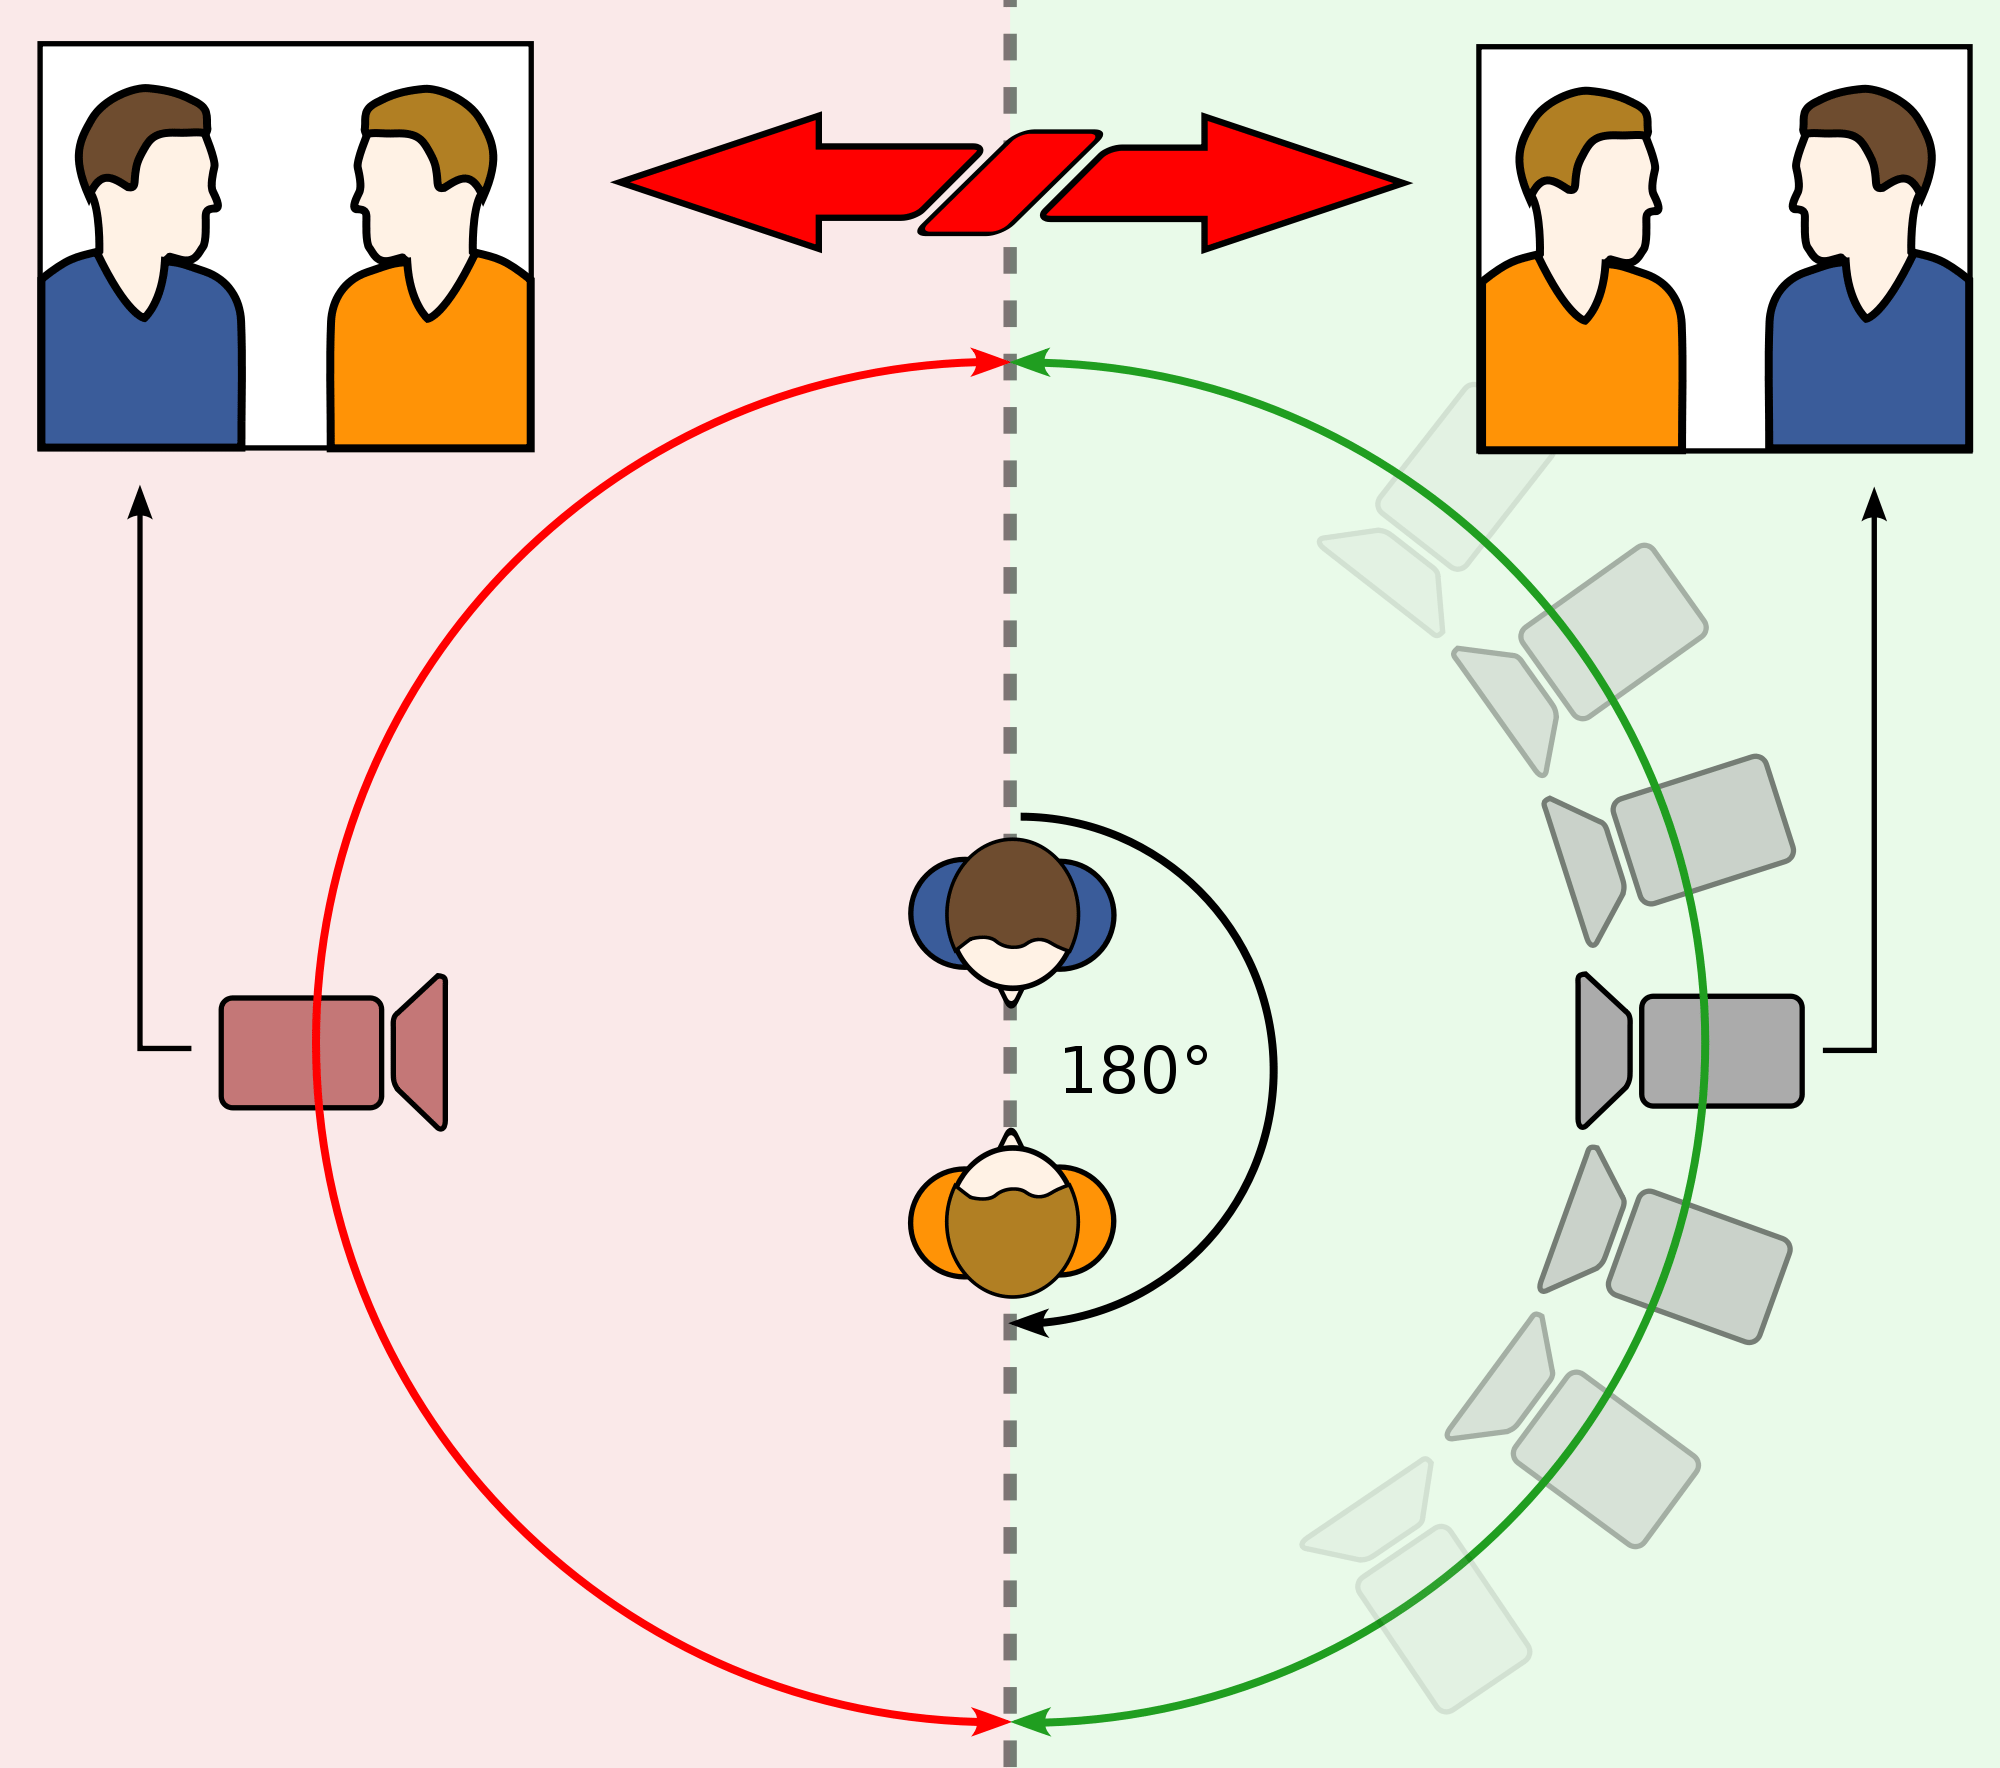
8) Stay on 1 Plane & 180* Rule
Draw a line where your subject is. Imagine that is the X axis on a coordinate plane. You never want to cross that X axis because it would mess with the natural perspective for the audience.
9) Change Focal Lengths
Changing the focal lengths of your shots is helpful when shooting the same subject for extended periods of time: like at a wedding or an interview. If you have close up shots and wide shots, you as the editor can avoid jump cuts and also put certain shots out of order or shorten footage without it being noticeable.
10) Motivate your Shots
Make sure that every edit and every cut had a reason to be changed. You should always have a reason for switching from camera angle or shot to another. In a perfect world, that motivation will always be to enhance the production’s storytelling ability.
When Can You BREAK the Rules of Video Editing?
It’s not often that you should break these 10 rules of video editing, but here we will discuss some opportunities to break them.
When you can break the rules of video editing 1-10:
- Honestly, never break this rule of editing unless you want to make your productions look amateur.
- Only break if you have B-Roll
- Only break if you have B-Roll
- Only break if you have B-Roll
- Only break if you have B-Roll
- The B-Roll rule of video editing should never be broken because, in essence, it is the rule that breaks the other rules. At its core, this rule is your last result when you cannot fulfill the requirements of the other 9 rules.
- Only break if you have B-Roll.
- There are 2 times you can cross your X axis: 1) When using a moving shot to cross the axis of action 2) You actually indicate on the screen that you are crossing the axis of action and the shot is a reverse angle. This is commonly done during sporting events.
- Only break this rule of video editing if you have B-Roll
- Occasionally, your motivation for transitioning shots will be based on an inconvenience that happened during shooting such as someone walking in front of the camera (which is helpful for wiping) or you bumped your camera to make it shake.
As you can see, the major excuse to break the majority of these rules is to use B-Roll, and even then, it is more of a last resort option. Also, B-Roll itself is a rule that states almost nearly that you use this rule to break other rules when there is not enough footage to make a scene congruent.
As you learned from the Common Video Vocabulary blog post, a B-Roll is supplemental or alternative footage used to break up a scene. Breaking up the footage can be helpful to make a scene more visually interesting as well as for hiding discrepancies in the preceding and following clips.
Of course, you may also break the rules of video editing when you want to mess with the members of your audience’s minds. For instance, jumping to different shots is often used in fight scenes. Jumping makes the scenes look more intense, fast paced, and dangerous. It also helps to hide the fake punches the actors throw at each other. 
Next time you watch any video or production, watch out for editors who have followed these rules, and editors who have broken them.
Check out the top 30 video editing terms you should know whether you are a professional or you are just beginning.


Comments
Post a Comment