How to Write and Read a YouTube Video Script (that Makes you Look Like a Pro)
How to Write and Read a YouTube Video Script (that Makes you Look Like a Pro)
You might think that to appear authentic in videos, you have to be unscripted and spontaneous. But I’m here to tell you that to appear natural and confident on video almost always requires an excellent script and the ability to read it as though you’re speaking extempore.
To appear natural and confident on video almost always requires an excellent script.
The first part – the ability to write an excellent script – is based on a basic storytelling technique. And in this article, I’ll show you how to develop a script formula that you can use again and again for all your videos.
The second part – reading a script naturally – is largely a matter of practice and confidence. However, there are some techniques that will make it easier to deliver your content in a smooth flowing manner which will make it enjoyable for your audience to watch.
How to Storyboard a Script
Different types of videos will require scripts of varying lengths and structures. Maybe you’re scripting a how-to video, or perhaps a promotional video.
No matter which type of script you’re writing, you can base it on a typical 3-act storytelling structure. The 3-Act structure breaks down a script as follows:
- Act 1: Setup
- Act 2: Conflict
- Act 3: Resolution

In the first act, you introduce your audience to a problem they might be facing.
In the second act, you escalate the problem to its climax.
And in the third act, you solve the problem for your audience, thereby reaching a resolution.
This basic storytelling structure can be applied to just about any kind of script you might be writing, from a How-To tutorial to a vlog.
Here’s how this script might look like in practice:
Act 1: The Setup
The problem is that your audience wants to make videos but they don’t know how to script a video for maximum effect.
Act 2: The Problem & Climax
Your audience is losing viewership and retention because people are not watching their videos till the end. The videos are not interesting and don’t keep people hooked till the end.
Act 3: The Resolution
You provide a formula to your audience that makes script-writing easier, manageable and adaptable to any video they might want to create.
If the above example looks awfully familiar to a blog post’s structure, that’s because it is! All good storytelling follows this basic structure.
But we’re going to slightly adapt this formula for a YouTube video, and here’s how we’re going to do it.
How to Write a YouTube Video Script – the VET Formula
YouTube videos typically perform better when someone clicks on a video title and then watches the video all the way until the end and then takes a specific action, such as subscribes to your channel, downloads a lead magnet, heads over to your sales page or watches another one of your videos.
To ensure that most viewers who watch your video, watch until the end, I’ve developed a very specific scripting process.
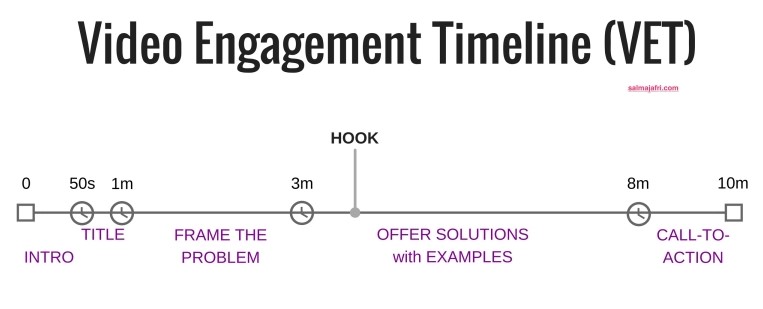
My scripting process is called the VET formula, where VET stands for Video Engagement Timeline.
And here’s what it looks like in graphical form:

Let’s break down the VET:
1. The Intro
This is your Act 1 that forms the first few seconds of your video where you get straight into the reason why someone would want to watch this video.
The purpose of your intro is to fulfill the promise of your video title so that your viewers feel they made the right decision to watch your video. You want to immediately put them at ease so they relax and want to watch the rest of your video.
Examples of video intro:
- Are you tired of not being able to shed those last few extra pounds? I want to show you a no-exercise method for losing the last few 1-5 stubborn pounds.
- You want to make more videos but you feel stiff and unnatural talking to a camera. I hear you! In this video, we’ll discuss a few simple strategies to help you loosen up and be yourself on video.
In your Intro, you typically don’t want to dawdle over who you are or what you do. Instead, you want to make it all about your audience and give value up front.
2. The Title Sequence
For a YouTube video, this is the point where you’d add in a title. This is typically where your branding goes.
Your title sequence tells your audience the type of show they’re watching and the tagline of your show. For other types of videos (Facebook Lives, Instagram Videos, etc) you can usually skip this part.
3. Frame the Problem
This is your Act 2 and the part in your video where you escalate the problem by adding context to it.
Talk about the problem you’ll be solving from different angles to help the viewer gain a deeper understanding of it. Discuss how the problem affects their business or life and why they may be facing this problem. This way you are building anticipation to a climax so that they are eager for your solution.

Talk about the problem you’ll be solving from different angles to help the viewer gain a deeper understanding of it.
Some example text at this point:
“Why is it so hard to be natural on camera?
Well, you might be feeling camera conscious due to a few reasons. Maybe you’re thinking of the camera as a device and not seeing there’s a person on the other end watching your video.
Or maybe you’re trying to be a perfectionist on camera and tripping up trying to fulfill what you believe are peoples’ expectations of you. Or perhaps you’re choosing the wrong content to present on camera and it’s feeling forced and unnatural.”
Framing the problem in this manner allows you to build relatability and trust with your audience.
4. The Solutions with CTA
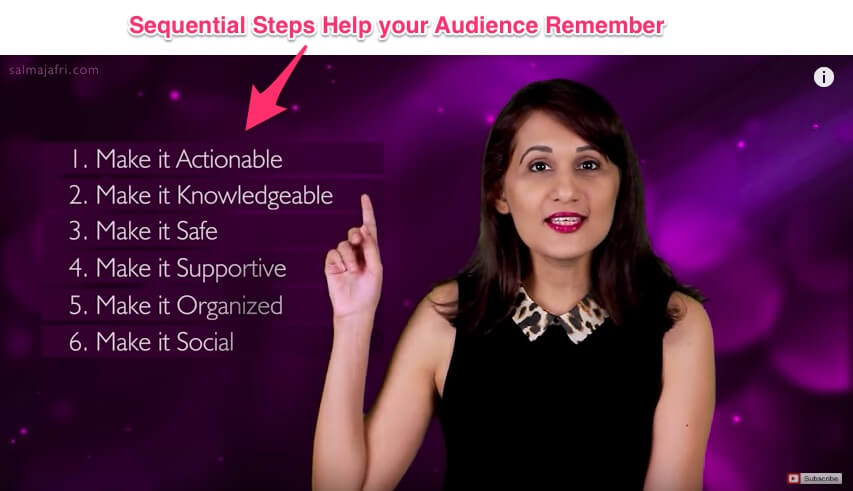
It’s finally time to present your answers and resolutions to your viewer’s problem. If you can make your resolution fit sequential steps, it’s usually easier to follow along on video.
Also, if you can show practical examples to fit each solution point, then that will help your audience remember your steps.
For example:
“With a few simple adjustments, you can start being awesome on camera. Let’s work on your camera presence with this simple 3-part routine:
Step 1: Imagine you’re talking to a friend who really needs to hear the information you’re giving.
Step 2: Remember that trying to be perfect on camera will ironically make you appear less authentic. So own your mistakes and quirks and talk as you would naturally, mistakes and all.
Step 3: Make sure the content you’re presenting on camera is something you are deeply interested in and could talk about at a moment’s notice. Passion always connects!”

For video, it’s always a good idea to indicate to your audience what you’d like them to do next. This is where your CTA comes in. Plan a clear, compelling and appropriate call-to-action for each video.
If you’re looking for opinions and engagement, ask people to comment and share. If you’re looking for leads, ask people to download and subscribe. If you’re looking for social proof, ask people to like and follow.
Example CTA:
“If you’re looking to practice your on-camera presence, take my 10-day video challenge to help you become a pro on video. Click the link in the description to sign up!”
After you’ve delivered value, this is your time to “make the ask”, so be sure you are clear in what you’d like your audience to do next!
Add Visual Interest to Your Script
Once you’ve got your core video script written out, it’s time to add some embellishments!
For YouTube videos that means additional footage that helps demonstrate concepts and keeps visual interest. This is also called “B-Roll footage” because it’s an addition to your A-Roll or “primary footage”.
You want to think about visual interest because it can get monotonous watching one person talk on video for a length of time, and sometimes concepts can be better explained with visual aids.
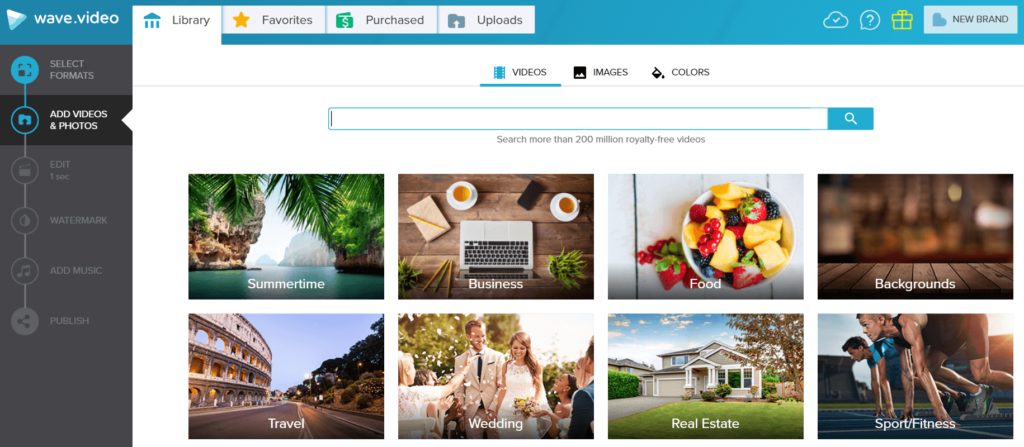
I like using Wave.video to add some extra footage to my YouTube videos. Typically I’d choose some stock video and overlay it with text and use my voice as narration.
Wave’s extensive library of stock videos and photos allows me to add lots of visual interest to my videos.

Wave.video stock library
You can also add visual interest by using screencasts, GIFs or memes or just shoot additional footage.
How to Read a Video Script
Once you’ve written out your script, you want to be able to present it naturally on camera.
It can be painstaking to have to memorize the entire script! You also don’t want to appear like you’re reading a script, which can make you look robotic and inauthentic.
Fortunately, if you’ve written your script according to the VET formula above, you don’t have to memorize your entire script. Instead, you just need to know the “flow” of your video script, as follows:
- What problem are you solving?
- How have you framed the problem?
- What are your sequential solution steps?
- What is your CTA?
Knowing your talking points makes both reading your script more natural and also makes editing your video easier. How?
Every time, when you refer back to your script for the next point, becomes a natural edit point. So you basically make a point, pause, glance at your script, back to the camera, and say your next point. Then just edit out the parts where you are glancing at the script.
Be sure to pause for 3 seconds before and after making a point to make editing even easier.
I also like to encourage people to practice the Intro and the CTA out loud in front of a mirror. These are the 2 most important parts of your video that will keep your viewers engaged and help them take the action you desire.
Therefore practicing these 2 sections till you know them by heart will result in a smooth start and smoother end to your video.
Wrapping Up
Remember, a natural sounding video takes some work and loads of practice.
So make sure to write a script designed to keep viewers engaged and then use the talking points from your script to naturally present it. Doing it this way will keep your video non-rambling, to the point, yet engaging and crisp. The end result will be a video that connects with viewers!

Comments
Post a Comment